Monitoring and performing payments
Dashboard interface allows you to monitor payment processing, perform payment link purchases, manage authorization holds on funds as part of executing two-step purchases, issue refunds and payouts in the following sections:
- Payments—section for monitoring information on all payment types and performing certain operations, which includes initiating capture and cancel operations within a two-step purchase, refunding purchases of any type, and issuing payouts.
- Payment links—section for performing payment link purchases.
- Manual payments—section for performing payouts as well as sending batch requests to capture held funds or cancel authorization holds and to issue mass refunds and payouts.
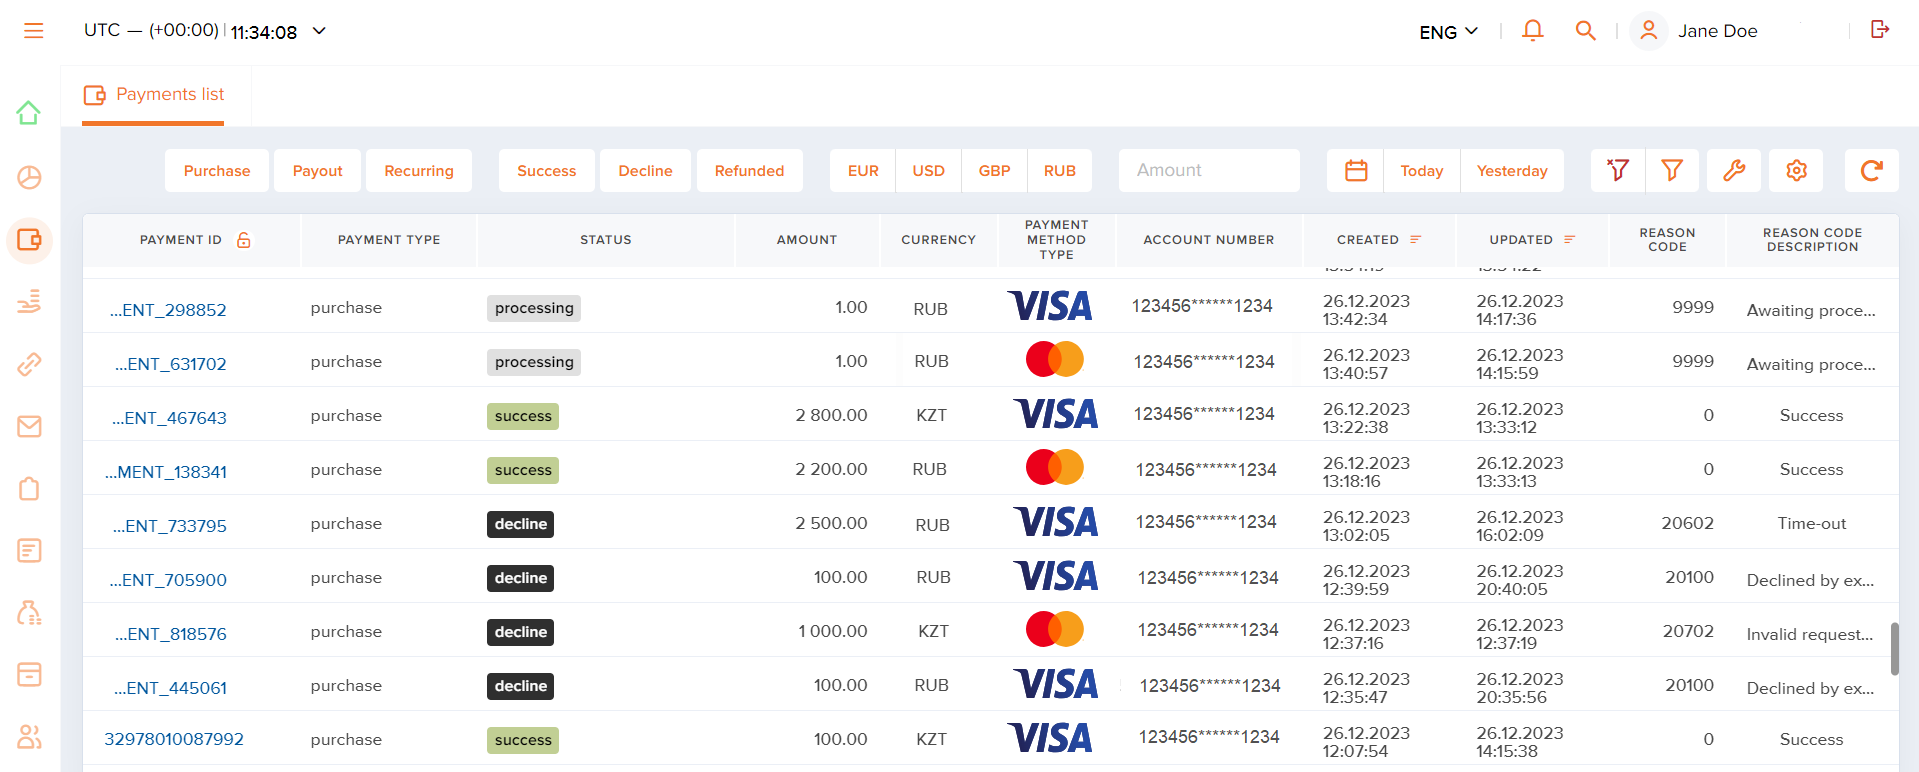
In both Payments and Manual payments sections, payment processing can be monitored in the corresponding consolidated register, with the possibility to filter data. In each register, users can also view detailed payment information about individual payments. Detailed payment information is shown in separate tabs, which allows users to switch between the register and the tabs more efficiently.
Figure: Payments list in the Payments section
When performing payment operations in the Dashboard interface, you can initiate a:
singleoperation when parameters are specified directly in the Dashboard interface and one request is sent to execute one operation.massoperation when parameters are uploaded in a file of the specified format following which a batch request is sent to execute multiple operations.
Access to sections Payments, Payment links, and Manual Payments and their specific features is granted through a relevant set of permissions. Therefore, if any of the features described below is not available to a certain user, you need to verify whether the user account in question has the appropriate set of permissions.
The guidelines on how to monitor payment processing, initiate payments, and work with batch requests are provided below.
Monitoring payment processing
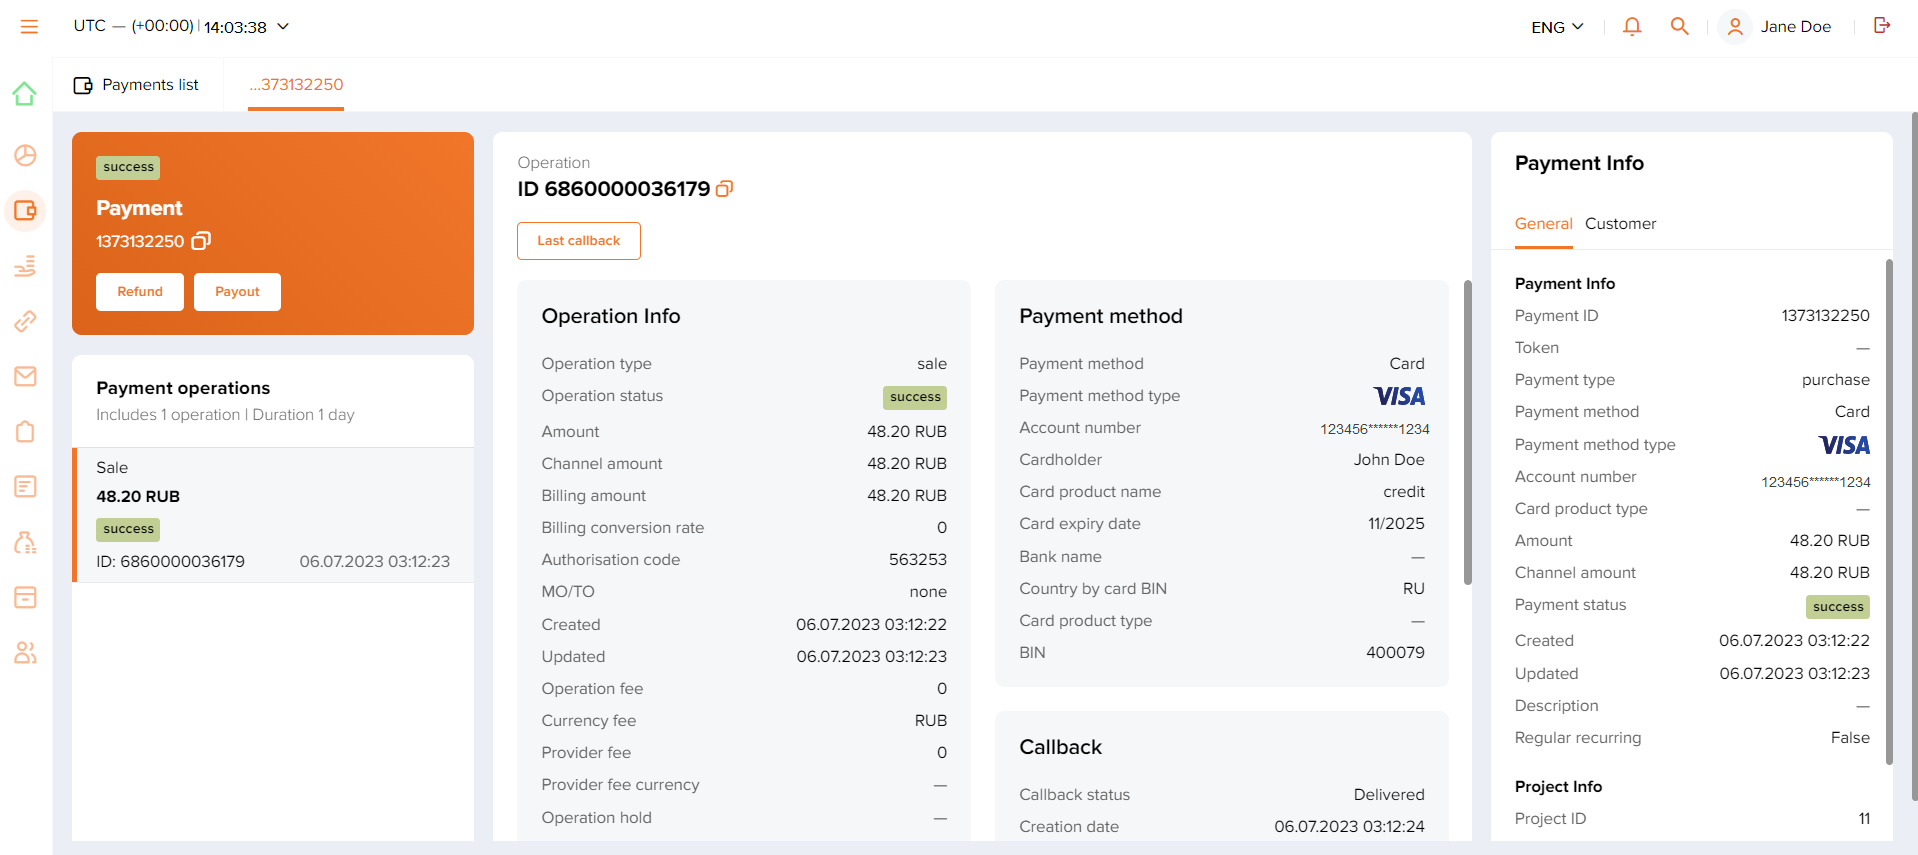
Sections Payments, Payment links, and Manual payments allow Dashboard users to monitor information about amounts, statuses, or other attributes of the processed payments. It can be done in the lists with the use of standard filtering tools (learn more) and in the payment information tabs (available in the Payments and Manual payments sections) that specify details of individual payments and all operations initiated within them (to open the payment information tab, click the row of the payment you need in the list).
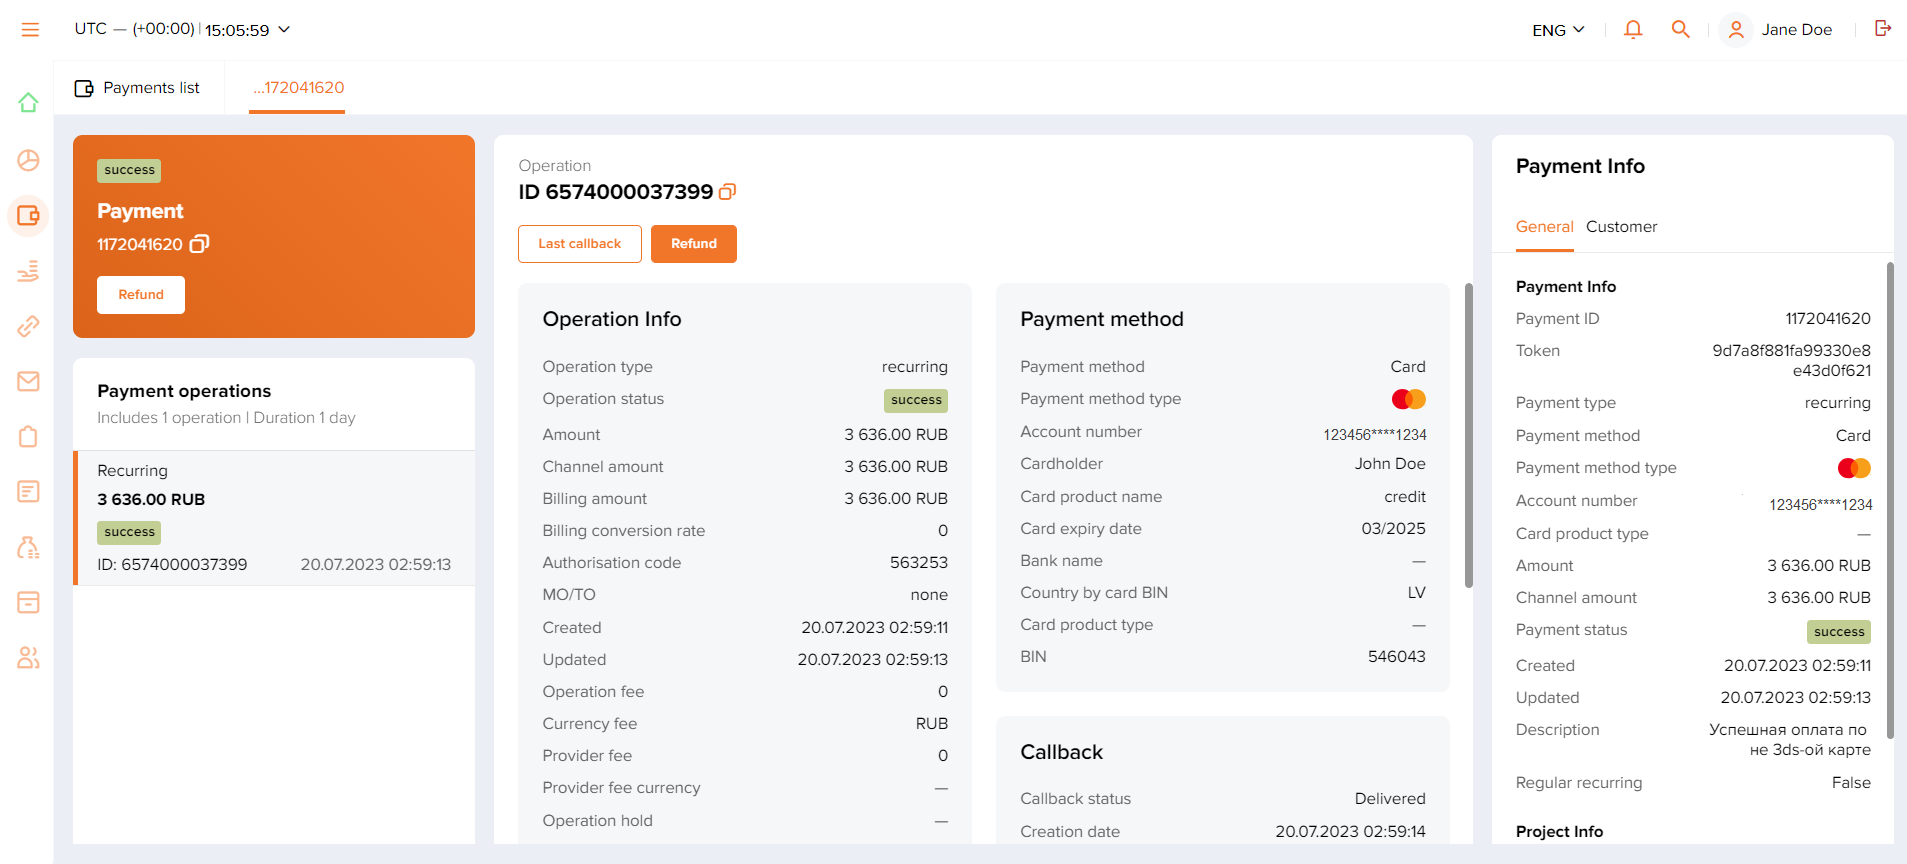
Figure: Payment details screen
To monitor information about specific payments:
- Select the section you need: Payments, Payment links, or Manual payments.
- Find rows with the information about specific payments in the list. Use filters, if necessary.
- Verify the information you need, either in the list or in the payment information tabs, if they are available.
When you work with lists, keep in mind the following:
- Information in lists and payment information tabs is shown with a time lag which can take up to several minutes. In addition, automatic data refresh is not supported.
- The number and the order of columns in the lists can be customized, which means that with the appropriate set of permissions the lists can be arranged according to individual needs.
- Key attributes of payments, which include identifier, type, status, amount, and currency, are by default shown in the first columns of the lists. They are used for filtering data with predefined filters on the filtering panel. It depends on the list which attributes and filters are available for filtering data.
- The Amount field shows the payment's base amount to which the status of the said payment currently applies.
For example, if a partial refund for 20 EUR was issued for the payment of 100 EUR, then the status
partially refundedapplies to the amount of 100 EUR, while the refund amount and the remaining amount are shown in the Refunded and Available for refund fields.Another example is a regular COF purchase. For this payment type, the
Amountfield shows the actual amount of the received funds.
If you have any questions about working with lists, contact your account manager.
Displaying summery table
In Dashboard, you can also display information about the payments performed within a certain period in a form of a summery table placed at the bottom part of the payment list.
To display the summary table:
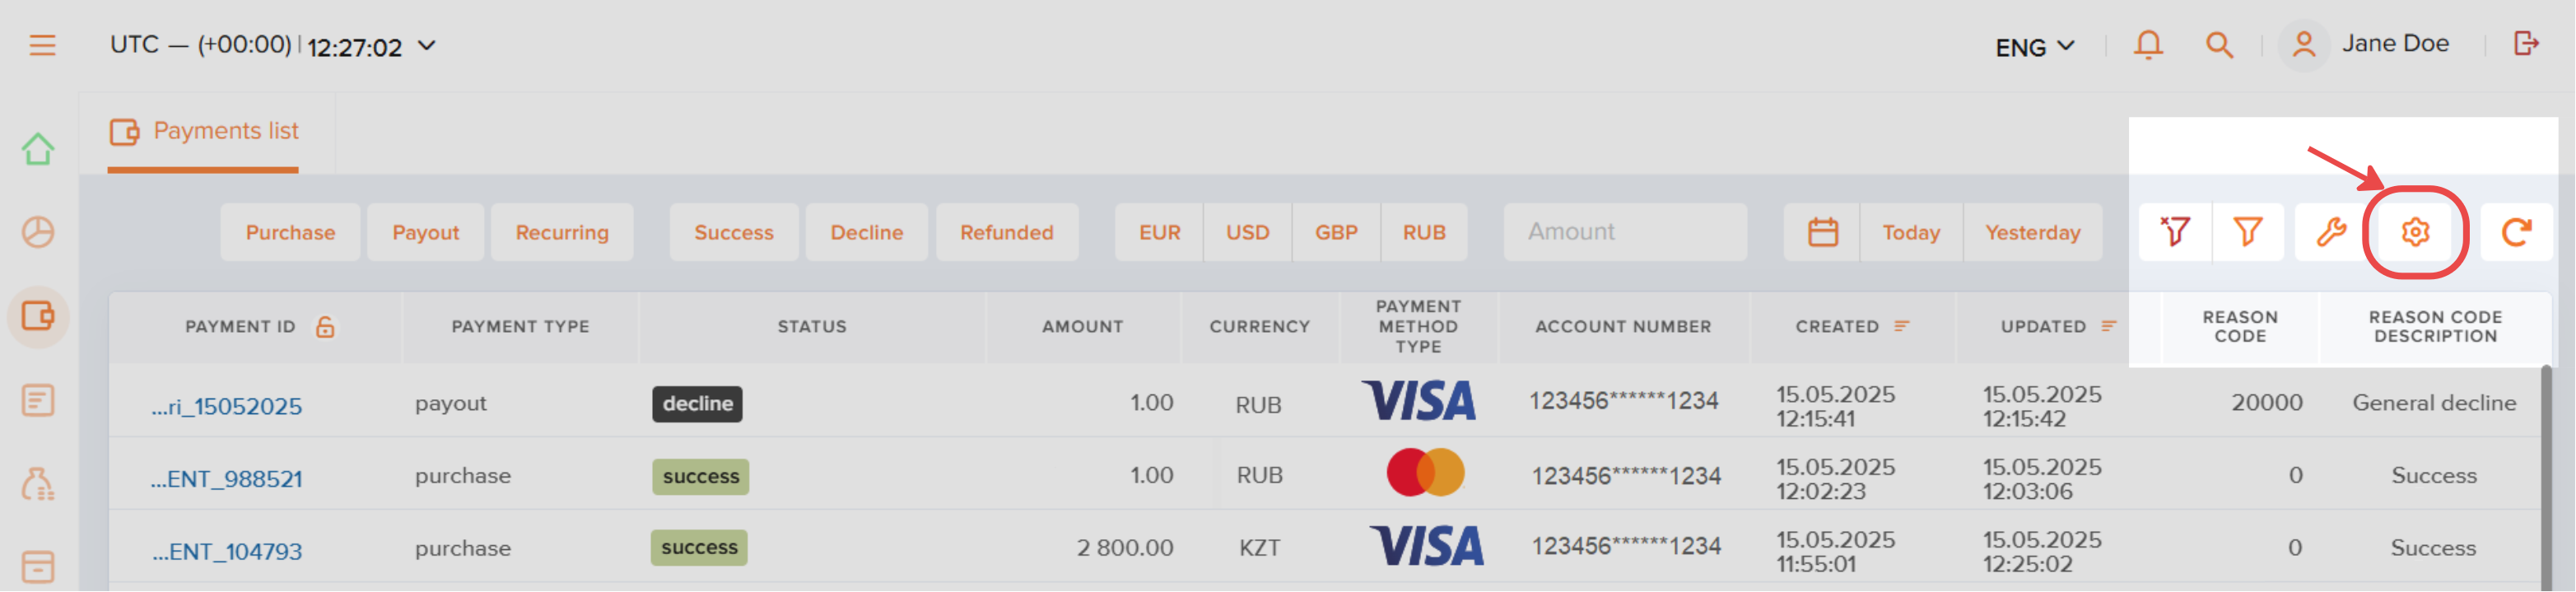
- Select the Payments section. Click the gear icon in the right upper corner.
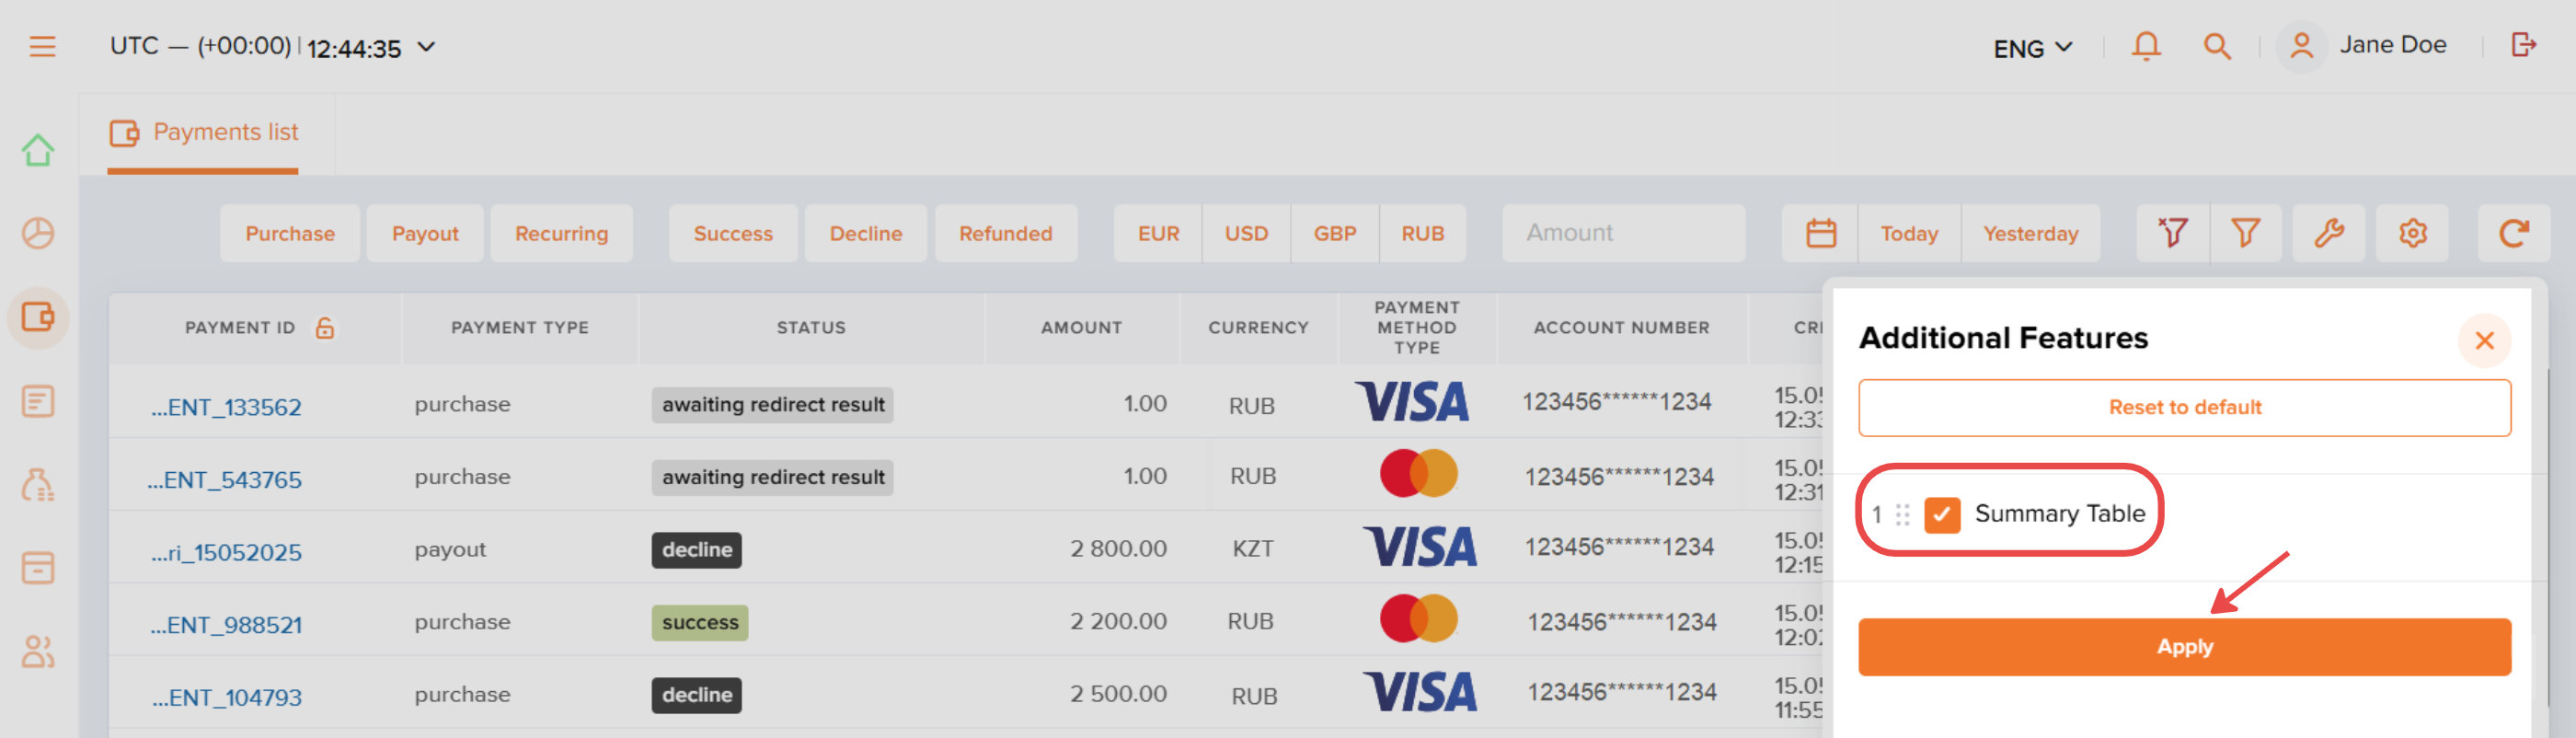
- Tick the Summary table field. Then click the Apply button.
- Apply some filters of interest in the upper part of the register. Then, if needed, specify the payment currency at the bottom, in the summary table.
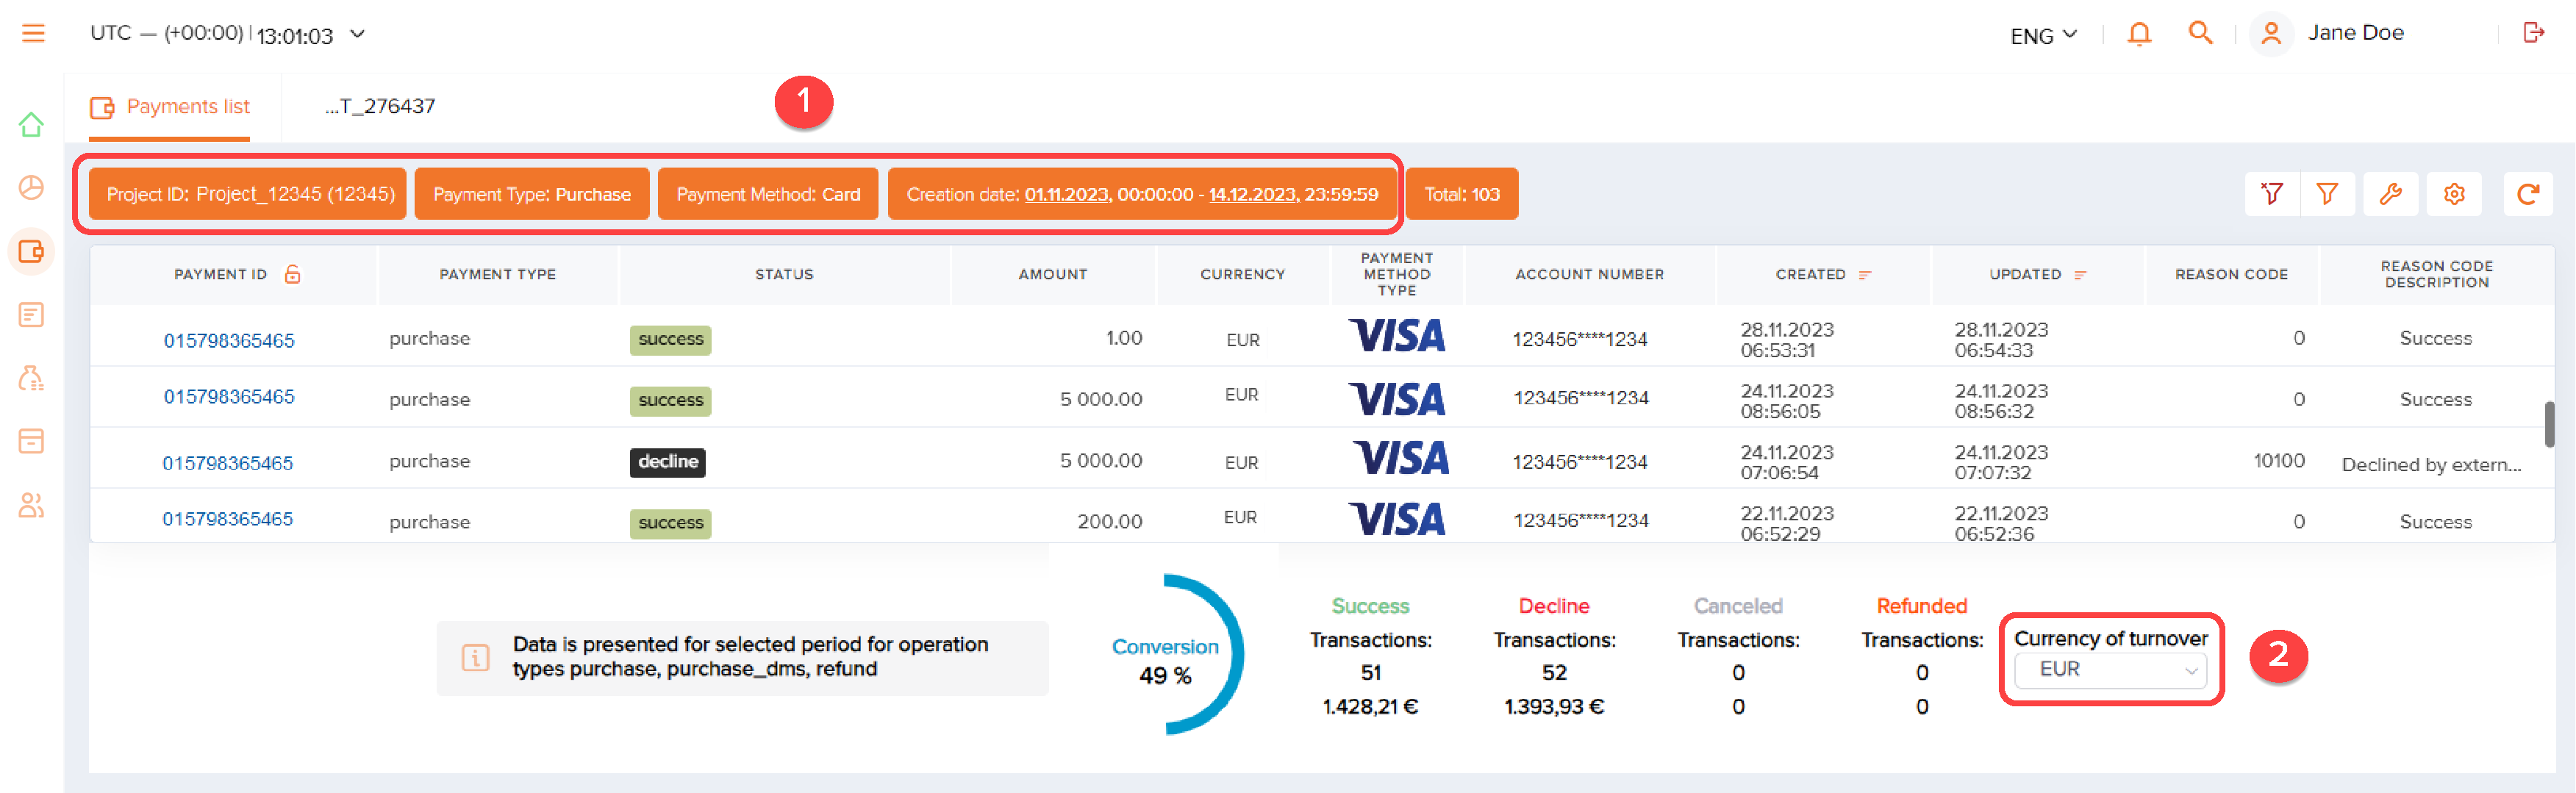
After applying filters, the register will display the payments according to the specified filters and the summary table will present the data about these payments. The total amount of the payments per the specified period will also be displayed in the upper left corner of the register.
Performing purchases
Overview
Dashboard allows users to:
- Create, send, and deactivate payment links. General description of the payment link purchase workflow can be found in the corresponding section.
- Manage authorization holds as part of executing two-step purchases. Held funds can be captured or released with the use of individual and batch requests. Learn more about performing two-step purchases in the corresponding section.
Requirements
To perform purchases by using Dashboard, the following requirements must be met:
- The user account must be granted the appropriate permissions. Each action, including capturing held funds and releasing authorization holds, requires a specific permission.
- Required actions are supported for the selected project and the payment method.
If any issues regarding access rights occur, they can be solved with the merchant's specialists.
Payment link purchases
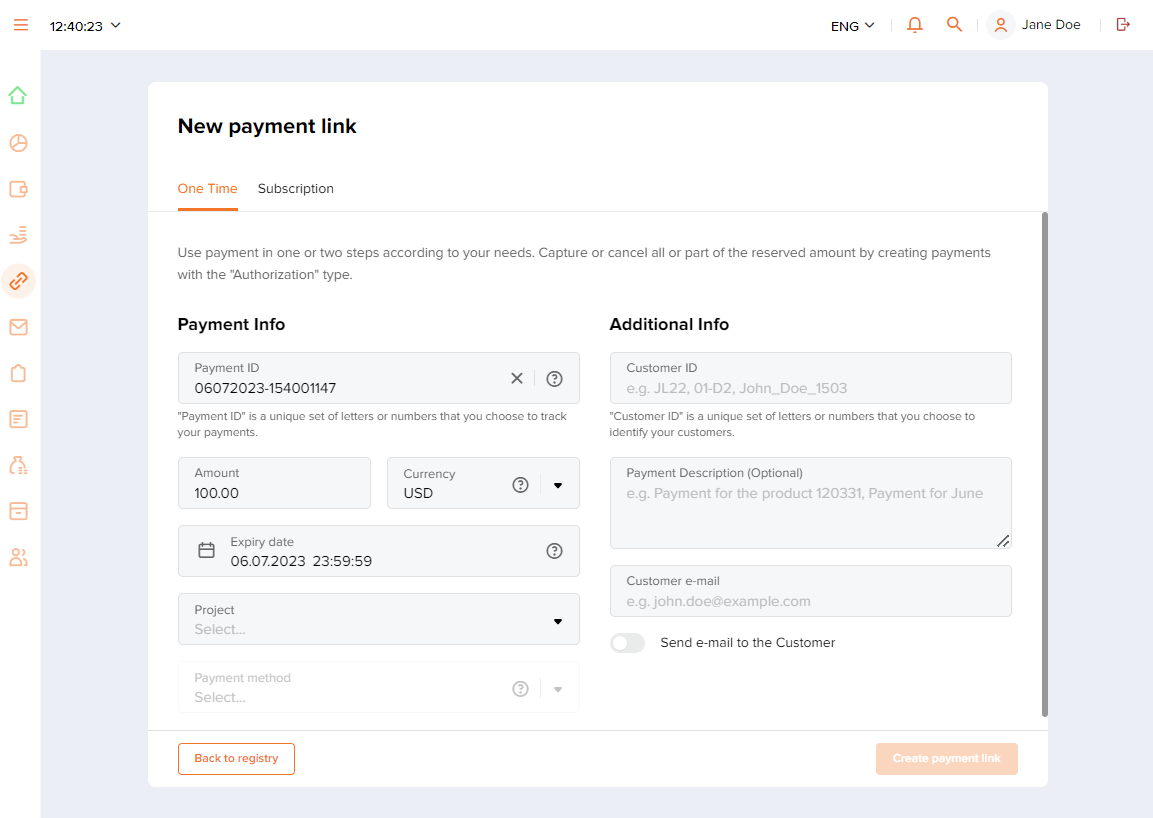
To perform a one-time payment link purchase:
- Open the tab to create a new payment link.
To achieve this, go to Payment links and click New payment link on the left of the filtering panel.
- Go to the One time tab.
- Specify purchase parameters and create the link.
To achieve this, fill in the fields and click Create payment link.
When filling in the fields, keep in mind that:
- The amount is entered as a decimal number with a point to separate fractional part (for example,
314.15). - Payment method selection is not available until the payment ID and the project have been specified.Note: The payment method selection is not required at this point. If the payment method wasn't selected, customers will be offered to select the payment method themselves when completing the payment.
- If the toggle switch Send email to the Customer is on, then the payment link is sent to the customer's email address automatically; if the toggle switch is off, make sure you send the payment link to the customer.
- If the fields are filled incorrectly, the error messages are shown.
- The Create payment link button is enabled when all the required parameters have been specified correctly (the payment method, payment description and the customer's email are not required, although it is recommended to provide the payment description and the customer's email to minimize risks during payment processing).
- The amount is entered as a decimal number with a point to separate fractional part (for example,
- If necessary, send the payment link to the customer.
This may be needed if, for example, auto-sending was not turned on when you were completing the new payment link form. In this case, to send the link, find the payment you need in the payment link purchases list, copy the link using
 button, and send it to the customer.
 - Make sure that the purchase has been processed.
You can do this by checking the status of the purchase in the payments list or in the payment link purchases list—it should state
success. For the comprehensive list of possible statuses for this payment type and their descriptions, see Payment link purchase: workflow and statuses.
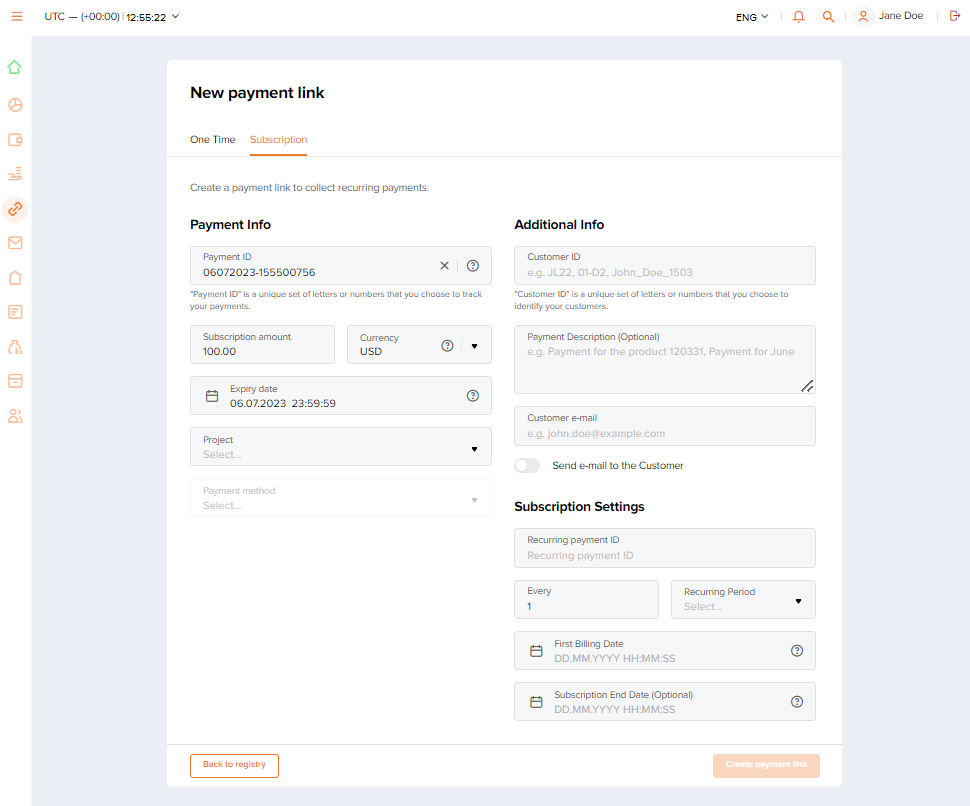
To perform a payment link purchase for the subsequent regular COF purchases (subscriptions):
- Open the tab to create a new payment link.
To achieve this, go to Payment links and click New payment link on the left of the filtering panel.
- Go to the Subscription tab.
- Specify purchase parameters and create the link.
To achieve this, fill in the fields, define the subscription settings (recurring payment ID, recurring interval and recurring start and end date) and click Create payment link.
When filling in the fields, keep in mind that:
- The amount is entered as a decimal number with a point to separate fractional part (for example,
314.15). - Payment method selection is not available until the payment ID and the project have been specified.
- If the toggle switch Send email to the Customer is on, then the payment link is sent to the customer's email address automatically; if the toggle switch is off, make sure you send the payment link to the customer.
- If the fields are filled incorrectly, the error messages are shown.
- The Create payment link button is enabled when all required parameters have been specified correctly (payment description and the customer's email are not required, but it is recommended to provide them to minimize risks during payment processing).
- The amount is entered as a decimal number with a point to separate fractional part (for example,
- If necessary, send the payment link to the customer.
This may be needed if, for example, auto-sending was not turned on when you were completing the new payment link form. In this case, to send the link, find the payment you need in the payment link purchases list, copy the link using
button, and send it to the customer. - Make sure that the purchase has been processed.
You can do this by checking the status of the purchase in the payments list or in the payment link purchases list—it should state
success. For the comprehensive list of possible statuses for this payment type and their descriptions, see Payment link purchase: workflow and statuses.
If you need to deactivate the payment link (before the customer makes the payment), turn on the toggle switch Link deactivation in the corresponding row of the list in the Payment links section. The link will no longer be valid, even if the link was already sent to the customer, and the customer will not be able to use it for making the payment.
Single capture and cancel operations
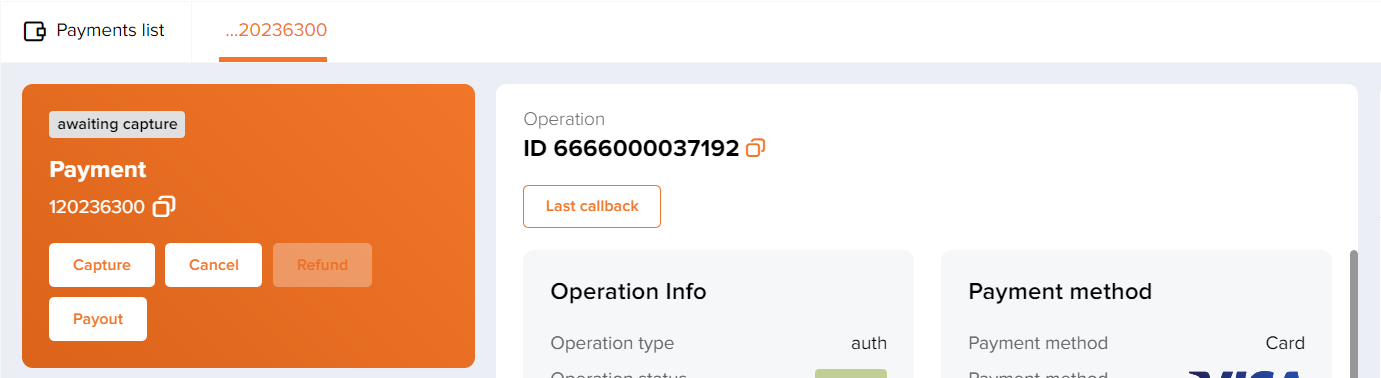
To initiate debiting of the authorized amount (cancel authorization hold) as part of executing an individual two-step purchase:
- If necessary, locate the purchase that requires debiting (release) of the authorized amount.
You can use the Search function (search by payment ID, for example) or go to the Payments section and apply necessary filters in the lists (for example, filter by operation type—
auth, or by payment status—awaiting capture). - Open the payment information tab for the target purchase.
Click the corresponding row in the list of the Payments section.
- Send a capture (cancel) request.
To achieve this:
- Click the Capture button located on the payment information panel to initiate the debiting of the authorized amount (click the Cancel button located on the payment information panel to release the authorization hold).
- In the window that opens, specify the required amount, which can be the entire authorized amount or its part.
When changing the authorized amount, keep in mind that this capability is not universally supported (due to regional specifics or other reasons) and that certain restrictions are imposed by payment systems (to learn more, see Request for release of authorized amount).
- Confirm your request by clicking Capture (Cancel).Note: If buttons Capture and Cancel remain inactive, it may mean that one of these operations is already being processed. If these buttons are absent, it may mean that performing such operations is not allowed for the payment with the given status.
- Click the Capture button located on the payment information panel to initiate the debiting of the authorized amount (click the Cancel button located on the payment information panel to release the authorization hold).
- Make sure that the
capture(cancel) operation has been processed.You can do this by checking the status of this operation in the tab with the detailed information about the target purchase. You can also check the status of this purchase in the payments list. The status of the operation (
captureorcancel) should statesuccess, while the status of the purchase should statesuccessif the held funds were captured andcancelled—if the hold on funds was released.If the operation request has been declined, its status switches to
declinewhile the payment status remainsawaiting capture.
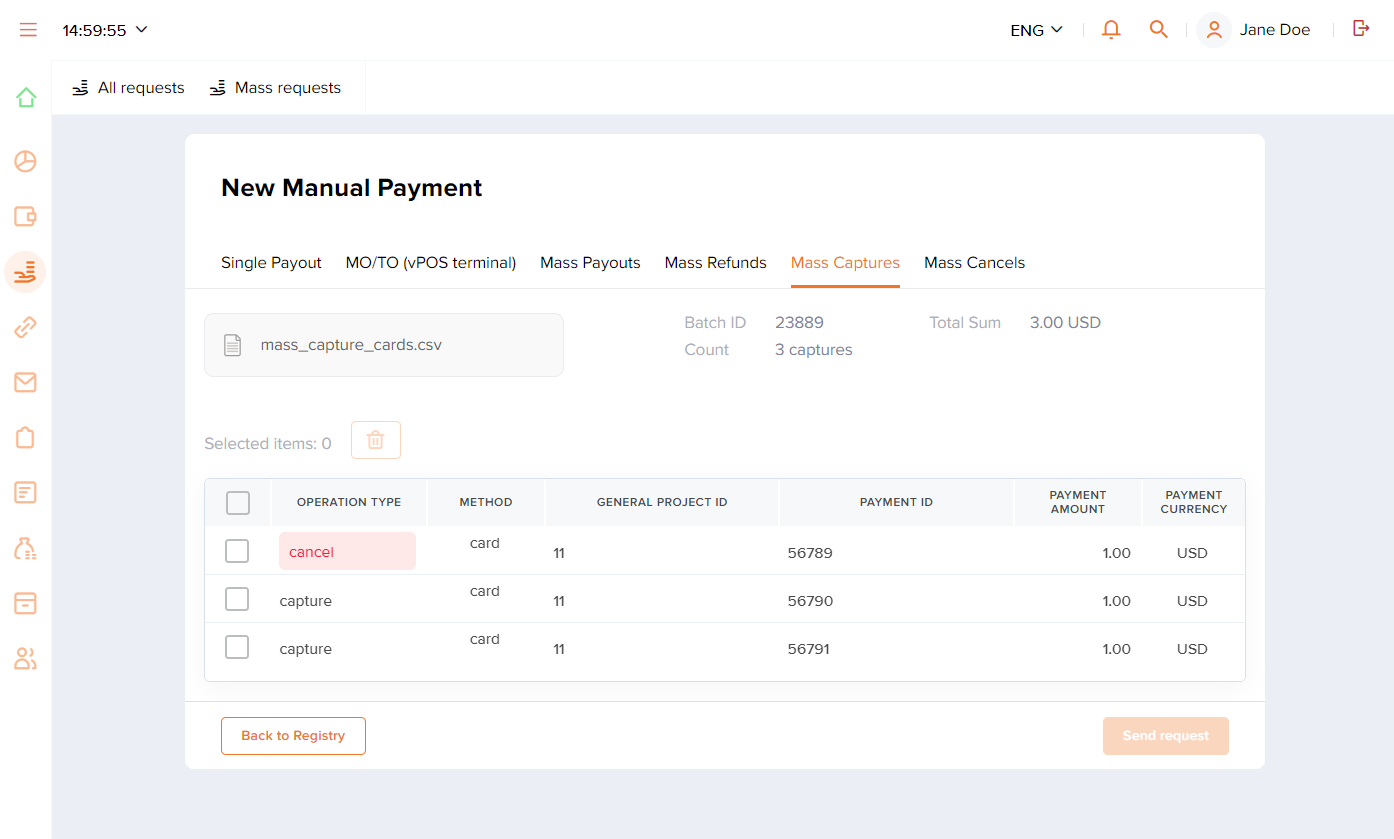
Mass capture and cancel operations
To perform capture or cancel operations using a batch request:
- Create and prepare the file with the
capture(cancel) operations data in the specified format.You can find the file requirements with the template and a file sample in Mass payments data.
Restriction: When preparing the file, keep in mind that it must contain operations of only one type—eithercaptureorcancel, while both the entire authorized amounts and the partial amounts can be specified as the amounts to capture (cancel). It is important to remember that changing the authorized amount is not universally supported (due to regional specifics or other reasons) and that certain restrictions are imposed by payment systems (to learn more, see Request for release of authorized amount). - Go to Mass Captures (Mass Cancels).
To achieve this, go to Manual payments, click Request on the left of the filtering panel and switch to the Mass Captures (Mass Cancels) tab.
- Upload the file with the list of operations and check it for data consistency.
Drag the file or use the Browse button to upload. After the file has been uploaded, make sure the Send request button is enabled. Use this button to send the batch request.
If the file is incorrect, the Send request button remains inactive and the error message is shown. In this case, view the error details (using the File preview toggle and then the File details button), and correct the errors.
- Send the batch request by clicking Send request.
- Make sure the requests have been processed.
You can monitor statuses and indicators of batch processing and statuses of individual operations.
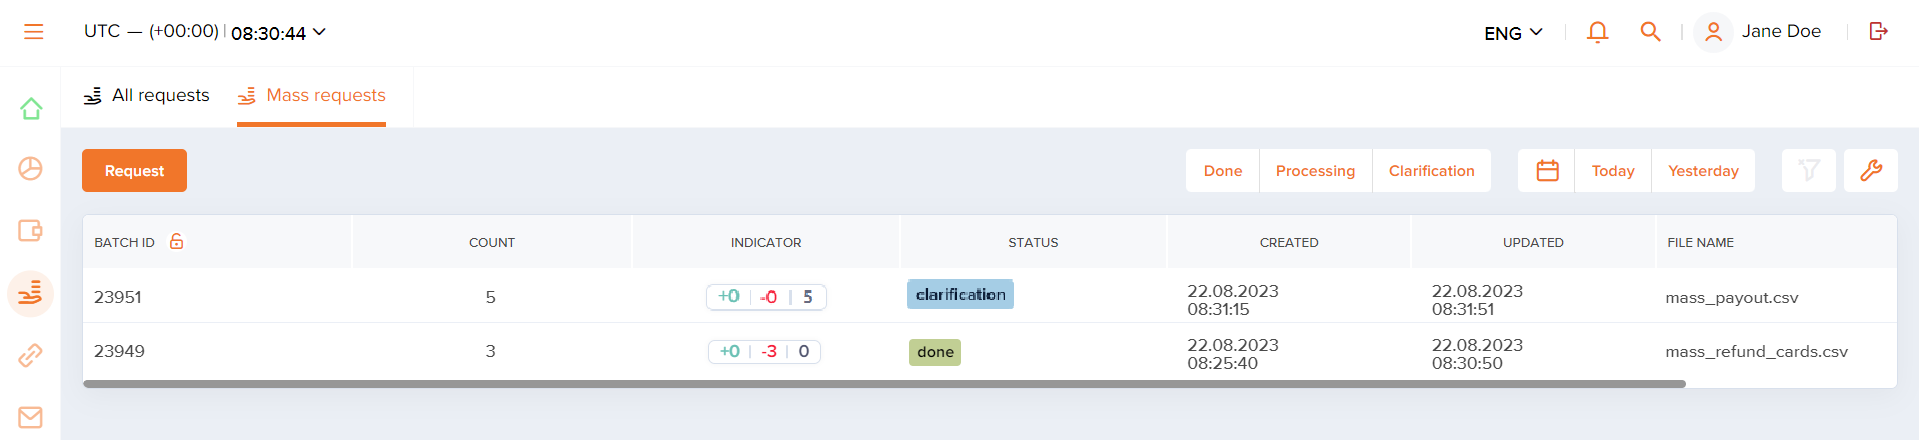
To monitor the state of batch processing in the list of mass requests, click Mass requests on the filtering panel in the Manual payments section, find the row of the batch you need in the list and check its status and indicator. Keep in mind that the time it takes to process operations and to update their status information can significantly vary depending on the number of operations in the batch. When the batch has been processed, its status should state
Done.To check the status of individual operations, check the status of the payments that require performing
captureorcanceloperations in the payments list (they should have the statussuccesswhen the authorized amount is debited orcancelledwhen the authorization hold is released). You can also check the statuses of operations in the corresponding payment information tabs (they should statesuccessordeclinedepending on the operation result).
Issuing refunds
Requirements
Dashboard interface allows users to refund all types of purchases either in full or in part, which includes refunding individual debits executed as part of the COF purchase. Issuing refunds can be done with the use of individual and batch requests, and in each case, the following requirements must be met:
- The user account has been granted the right to issue refunds.
- The purchase (the individual debit executed as part of the COF purchase) to be refunded has been fully processed.
- The balance under which an initial payment was performed has enough funds for issuing a refund.
If any issues regarding these requirements occur, they can be solved with the specialists in charge of granting access rights and working with balances.
Single refunds
To issue a refund for a single purchase or a single debit executed as part of the COF purchase:
- If necessary, locate the purchase that needs to be refunded.
You can use the Search function or go to the Payments section and apply necessary filters in the lists.
- Open the payment information tab for the target purchase.
Click the corresponding row in the list of the Payments section.
- Send a refund request.
To achieve this:
- Click the Refund button located on the information panel on the left if you need to refund the whole purchase or on the Operation panel in the center if you need to refund an individual debiting operation performed as a part of the COF purchase.
- In the window that opens, specify the required refund amount (full available or its part).
- Confirm your request by clicking Refund.
Note: If the Refund button is disabled, it may mean that the payment has not been fully processed yet. - Click the Refund button located on the information panel on the left if you need to refund the whole purchase or on the Operation panel in the center if you need to refund an individual debiting operation performed as a part of the COF purchase.
- Make sure that the refund has been issued.
You can do this by checking the status of the operation in the payment information tab (it should state
success) or the status of the payment in the Payments list (when the payment is refunded in full, the status isrefundedorreversed; when only the part of the payment amount is returned, the status ispartially refunded).
You can also issue a refund for a single purchase from the list with payments data. To do that:
- If necessary, locate the purchase that needs to be refunded.
You can use the Search function or go to the Payments section and apply necessary filters in the lists.
- Click the
 button and specify the refund amount in the opened window.
 - Click the Refund button.
- Make sure that the refund has been issued.
You can do this by checking the status of the operation in the payment information tab (it should state
success) or the status of the payment in the Payments list (when the payment is refunded in full, the status isrefundedorreversed; when only the part of the payment amount is returned, the status ispartially refunded).
If the refund has been declined, the status of the operation switches to decline while the status of the payment remains unchanged. The decline can happen due to a variety of reasons. For example, it can be caused by the lack of funds, in which case you can add funds to the balance and try to issue a refund again.
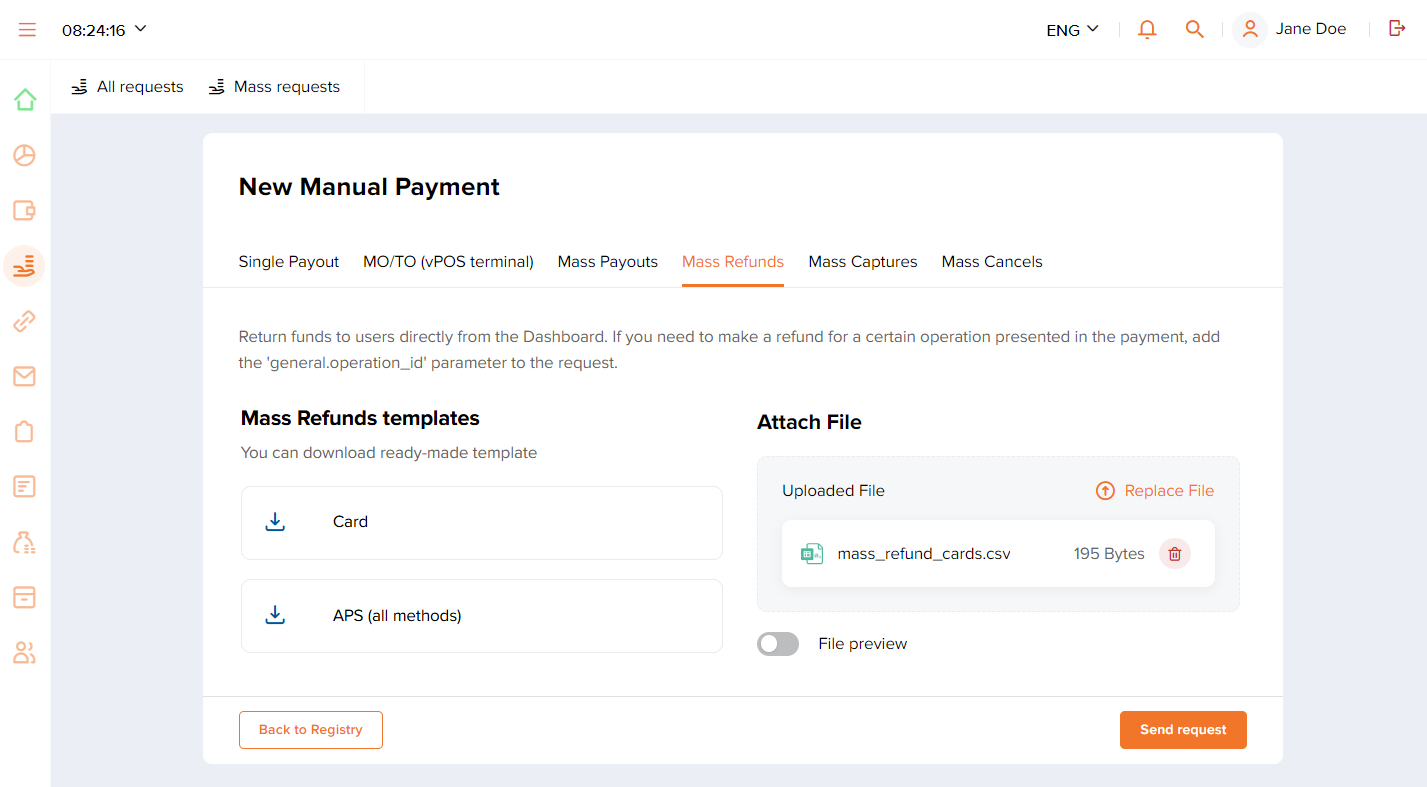
Mass refunds
To issue multiple refunds using a batch request:
- Create and prepare the file with the refund data in the specified format.
You can find the file requirements with the template and a file sample below.
Note: When preparing the file, keep in mind that to refund purchases, you must specify the identifier of the payment to be refunded in thegeneral.payment_idfield while to refund an individual debiting operation performed as part of the COF purchase, you must also include the identifier of the operation to be refunded in thegeneral.operation_idfield. - Go to the Mass Refunds tab.
To achieve this, go to Manual payments, click Request on the left of the filtering panel and switch to the Mass refunds tab.
- Upload the file with the list of refunds and check it for data consistency.
Drag the file or use the Browse button to upload. After the file has been uploaded, make sure the Send request button is enabled. Use this button to send the batch request.
If the file is incorrect, the Send request button remains inactive and the error message is shown. In this case, view the error details (using the File preview toggle and then the File details button), and correct the errors.
- Send the batch request by clicking Send request.
- Make sure the refunds have been processed.
After the batch request has been sent and you can see the notification that it has been accepted, it is important to check that the refunds have been processed. Look up the batch status in the list of mass requests—the status should state
Done(click Mass requests on the filtering panel in the Manual payments section and find the row of the batch you need in the list). You can also monitor status information of individual refunds using the column Indicator. Keep in mind that the time it takes to process refunds and to update their status information can significantly vary depending on the number of refunds in the batch.To check the status of individual refunds, check the status of the payments that need to be refunded in the Payments list (they should have the status
refundedorreversedwhen the payment is refunded in full andpartially refundedwhen only the part of the payment amount is returned). You can also check the status of a refund in the corresponding payment information tab (it should statesuccessordeclinedepending on the operation result).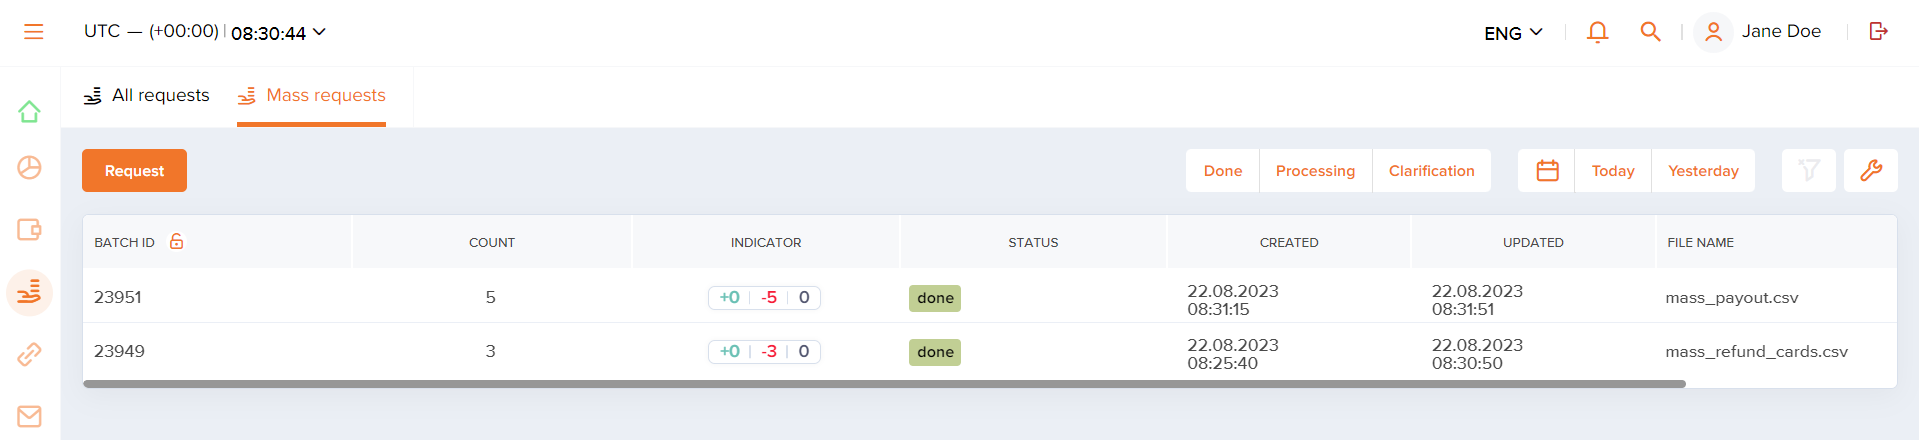
If you have any questions about issuing refunds, contact technical support specialists.
Performing payouts
Dashboard allows users to perform payouts with the use of individual and batch requests.
Requirements
- Two-factor authentication is enabled for the Dashboard user account in question.
- The user account has been granted the right to perform payouts.
- The balance under which payouts are performed has enough funds.
- If additional data is required to perform a payout, it has to be provided within 22 hours.
If any issues regarding these requirements occur, they can be solved with the specialists in charge of granting access rights and working with balances.
In any payout type—either single payout or batch payout—you can issue one or more retries if the initial attempt is declined, for example because daily limit for payouts in the payment system is reached or the payment system services are unavailable. The payment platform can be set up to issue retries automatically after specific timeout, or technical support specialists can issue them manually. The number of retries is always limited. To enable the retry functionality, contact your account manager at Rocketpay; to set up retries number limit and delay between retries, contact technical support service (support@rocketpay.kz).
Single payouts
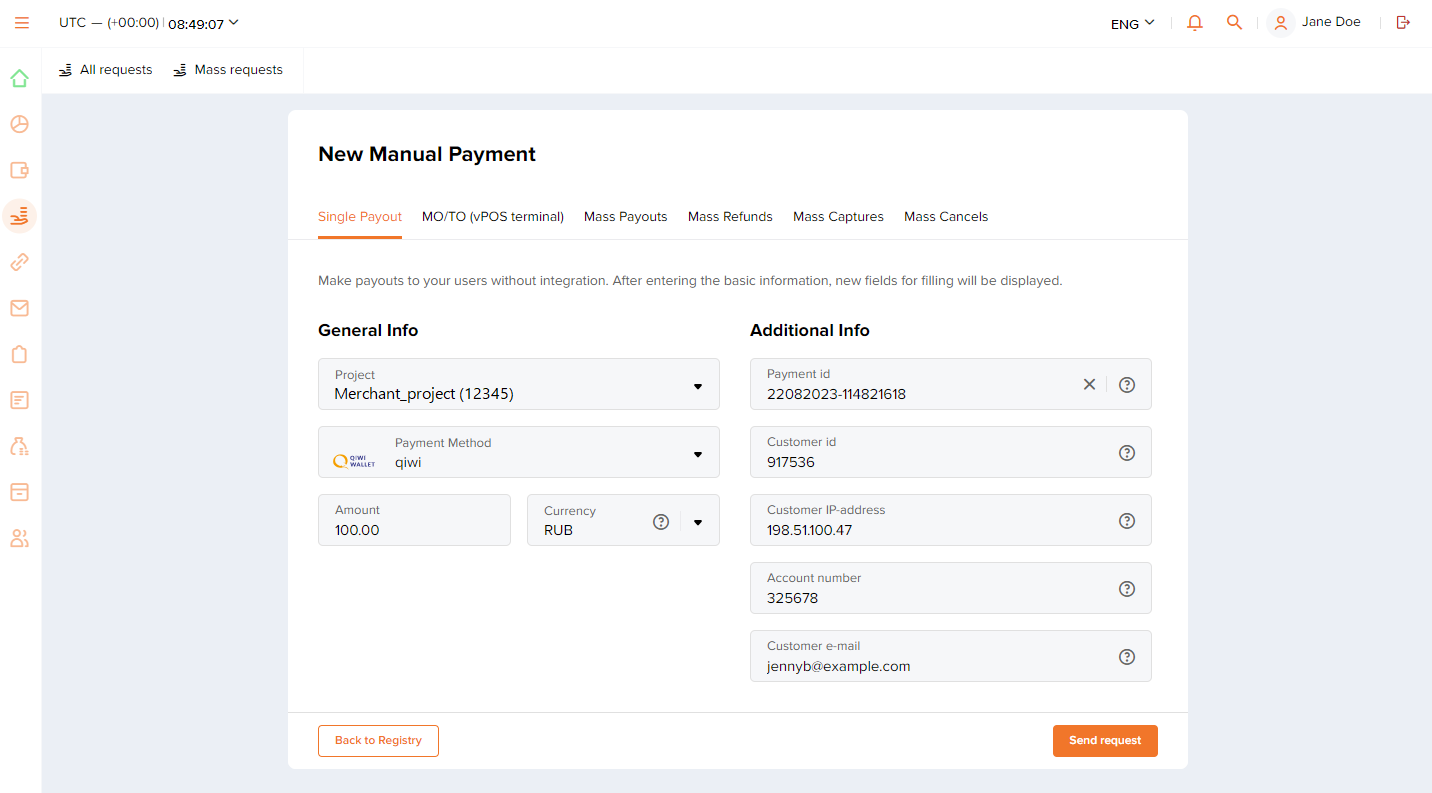
To perform a single payout:
- Go to the Single payout tab.
To achieve this, go to Manual payments, click Request on the left of the filtering panel and switch to the Single payout tab.
- Specify payout parameters and send a payout request.
To achieve this, fill in the fields and click Send Request.
When filling in the fields, keep in mind that:
- The amount is entered as a decimal number with a point to separate fractional part (for example,
314.15). - The Send Request button is enabled when all parameters have been specified correctly.
- If some of the fields are filled incorrectly, after pressing the Send Request button, the error message "Specify payout parameters" is shown.
- The amount is entered as a decimal number with a point to separate fractional part (for example,
- If additional payment information is required, specify the parameters needed (you can also decline the payment).
When the payout is processed, its parameters are validated, following which a notification is displayed in the Single payout tab. If the parameters satisfy all requirements, the notification states that the request has been successfully processed. If certain parameters, which are not mandatory in general but can be required in a specific situation, are absent, fields where you can enter the required additional information are shown. In this case, to proceed with the payment, specify the information needed and click Proceed; to decline the payment, click Reject Payout.
If for any reasons (to get more accurate information, for example) you need to pause and return to performing the payout later, you can find this payout in the payouts list using the Clarification filter and clicking the corresponding row.
Restriction: By default, additional payment information has to be provided no later than 22 hours after the clarification request was received.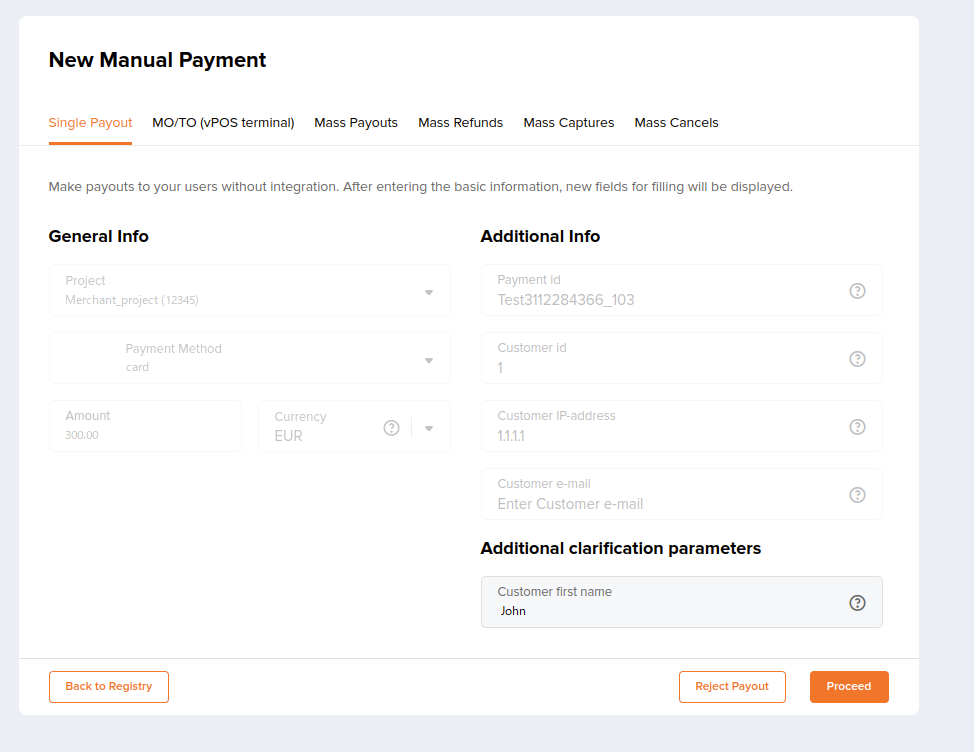
- Make sure that the payout has been processed.
Verify the status of this payout in the Payouts or Payments list—it should state
success.
If the payout is declined, the payment status switches to decline. It can happen due to a variety of reasons. For example, it can be caused by the lack of funds, in which case you can add funds to the balance and try to perform a payout again.
Mass payouts
General steps
To perform a series of payouts using a batch request:
- Create and prepare a file with the payout data in the specified format.
You can find the file requirements with the template and a file sample below.
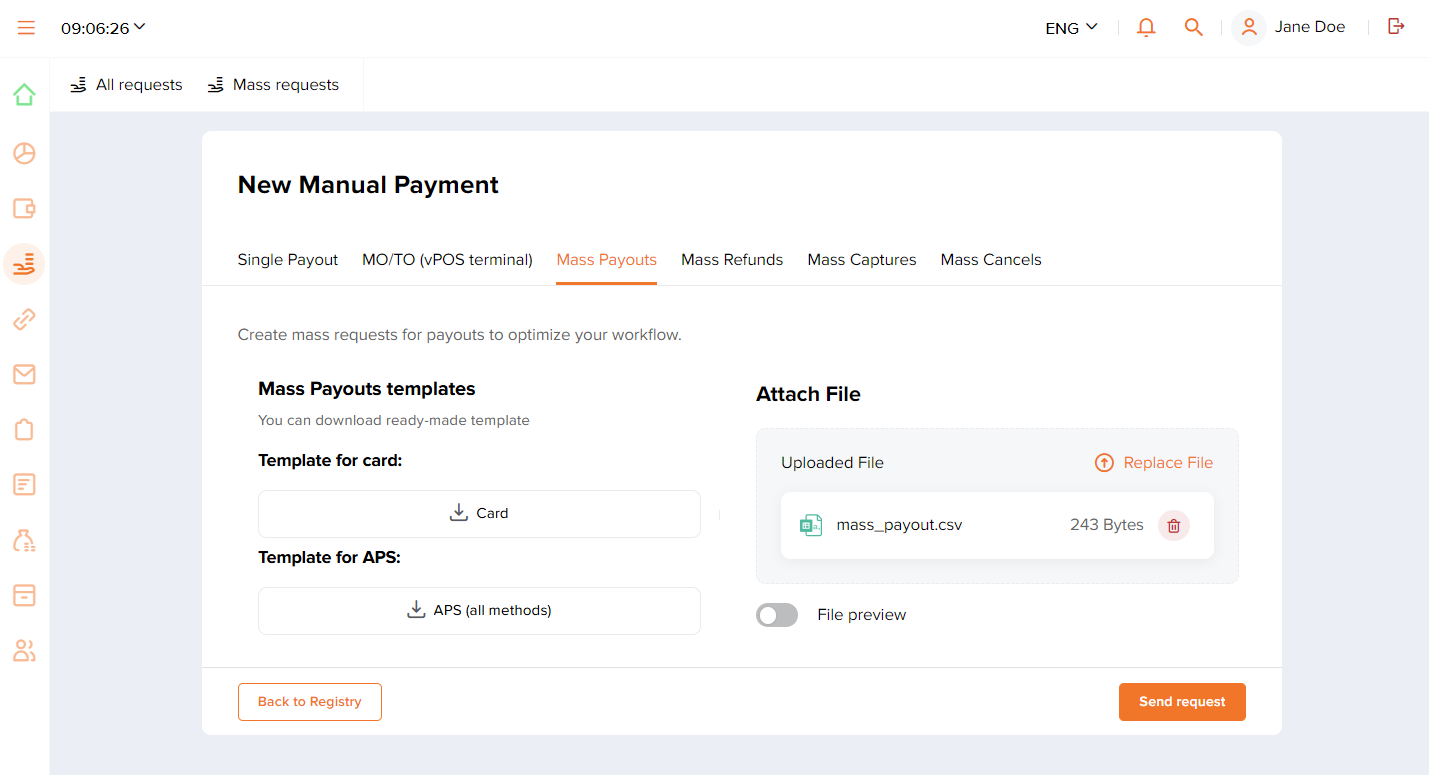
- Go to the Mass payouts tab.
To achieve this, go to Manual payments, click Request on the left of the filtering panel and switch to the Mass payouts tab.
- Upload the file with the list of payouts and send the batch request.
Drag the file or use the Browse button to upload. After the file has been uploaded, make sure the Send request button is enabled. Use this button to send the batch request.
If the file is incorrect, the Send request button remains inactive and the error message is shown. In this case, view the error details (using the File preview toggle and then the File details button), and correct the errors.
- Make sure the specified data is sufficient and the payouts have been processed.
After the batch request has been sent and you can see the notification that it has been accepted, it is important to check that the payouts have been processed. Look up the batch status in the list of mass requests—the status should state
Done. Keep in mind that the time it takes to process payouts and to update their status information can significantly vary depending on the number of payouts in the batch.If a single payout request in the entire batch requires additional information, the batch status switches to
Clarification. In this case, you can either specify the parameters needed for the target payouts, or decline them. Learn more about these options below.You can also monitor status information of payouts in the batch using the column Indicator in the list of mass requests.
Submitting additional information
When the payout batch request is processed, parameters of each payout have to be validated. If the parameters satisfy the requirements, no additional actions are necessary. If certain parameters, which are not mandatory in general but can be required in a specific situation, are absent, you need to submit additional information. This necessity is indicated by the status Clarification for individual payouts and the entire batch in the list of mass requests.
If submitting additional information is necessary for certain payouts in the batch, you can selectively specify the required parameters or decline these payouts. In such cases, you can work with individual payouts (which is convenient when additional information is required only for one payout in the entire batch, for example) or several payouts at the same time (when additional information is required for a series of payouts, for example) and specify the information needed in the Dashboard interface or by uploading a file.
To submit additional information for a single payout:
- Locate and open the payout information tab you need.
To find this payout in the All requests list, use the Clarification filter and click the corresponding row.
- Specify the requested data and click Proceed.
You can also use the payout information tab to decline the processing of this payout by clicking Reject Payout.
To submit additional information for a series of payouts:
- Locate and open the batch with the target payouts whose parameters require clarification.
To find this batch in the Mass requests list, use the Clarification filter and click the corresponding row.
- Switch to editing mode by clicking Manage on the left of the filtering panel.
- Specify the required parameters.
You can use the Dashboard interface directly by entering data into the cells marked with
 or update the file you have uploaded. In the latter case, download the file using the
  button. Specify the required parameters in the cells marked
 *required*and upload the updated file using the button.
In each of these cases, you can submit additional data for payouts that you need to be processed, not necessarily all that require it. The ones which you have decided not to specify additional information for are going to be declined after the clarification waiting time is over.
Restriction: By default, additional payment information has to be provided no later than 22 hours after the clarification request was received. However, certain payment systems may require additional information specified within shorter amounts of time. Contact technical support for more information about specific payment methods.
- Save changes and send data by clicking Apply.
Editing mode also allows you to decline processing of individual payouts. Check the rows you need (in the first column of the table) and click Reject.
If you have any questions about performing payouts, contact technical support specialists.
Creating reports
Overview
In Dashboard, you can create reports containing information on the payments performed in the Rocketpay payment platform. The report can then be downloaded to your device in the CSV format.
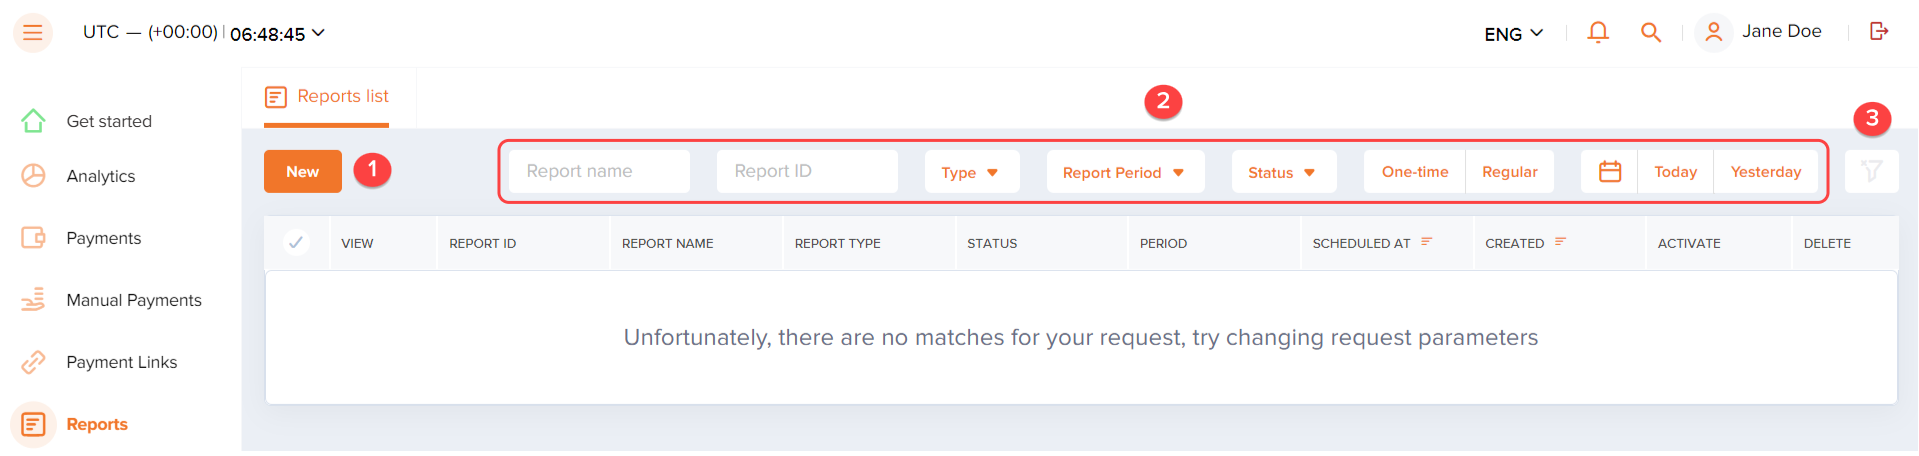
To find the tools for creating reports, go to the Reports section.
Figure: Elements of the Reports section: 1—button to create a new report; 2—filters for a quick search of a created report; 3—button to reset all applied filters.
Creating reports
To create a report with information on operations in Dashboard:
- Go to the Reports section.
- Click New in the upper left corner of the window.
- Set the required parameters and columns of your report.
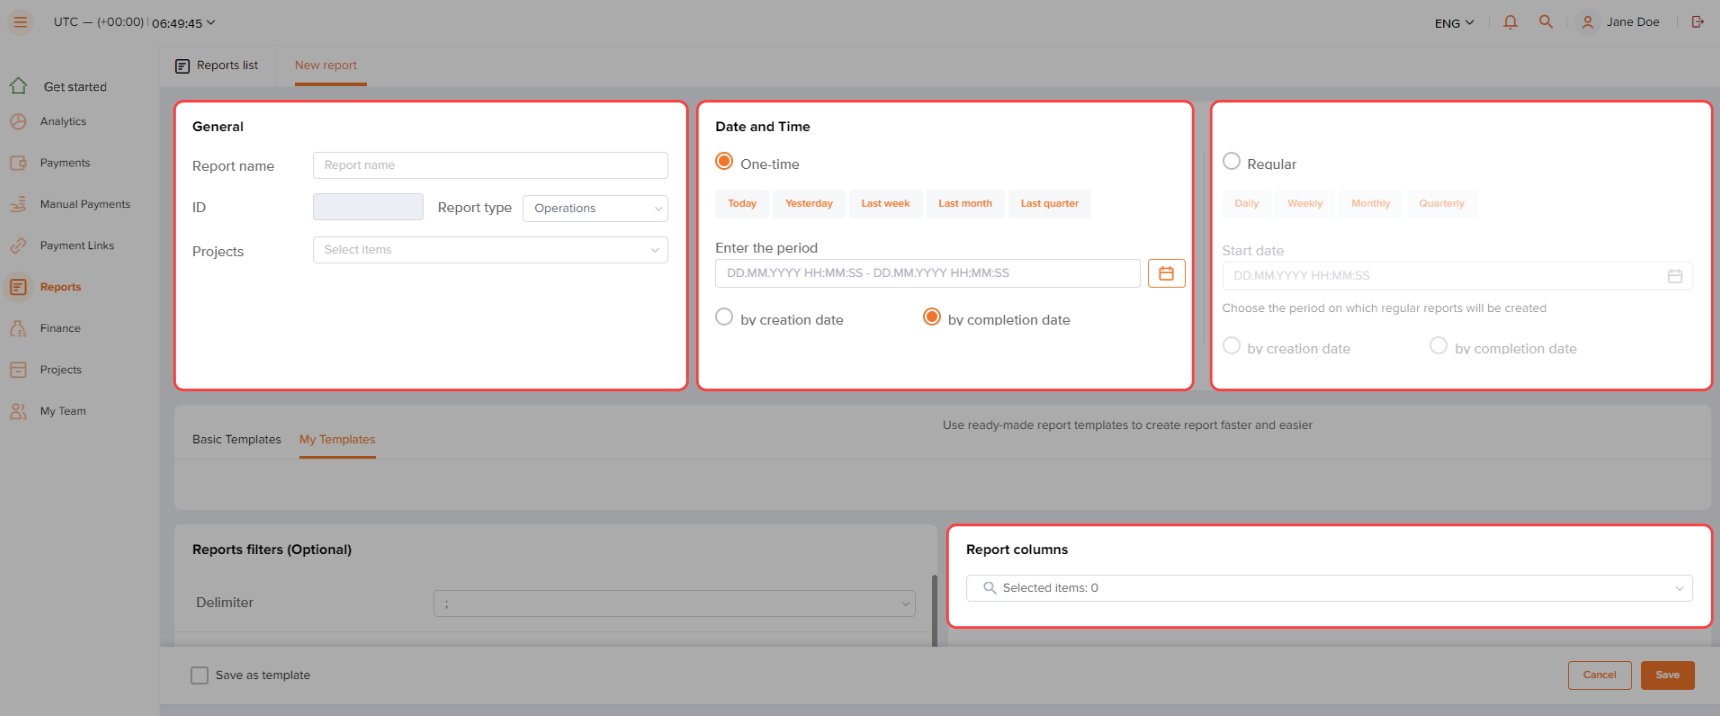
- Apply some optional filters, if necessary.
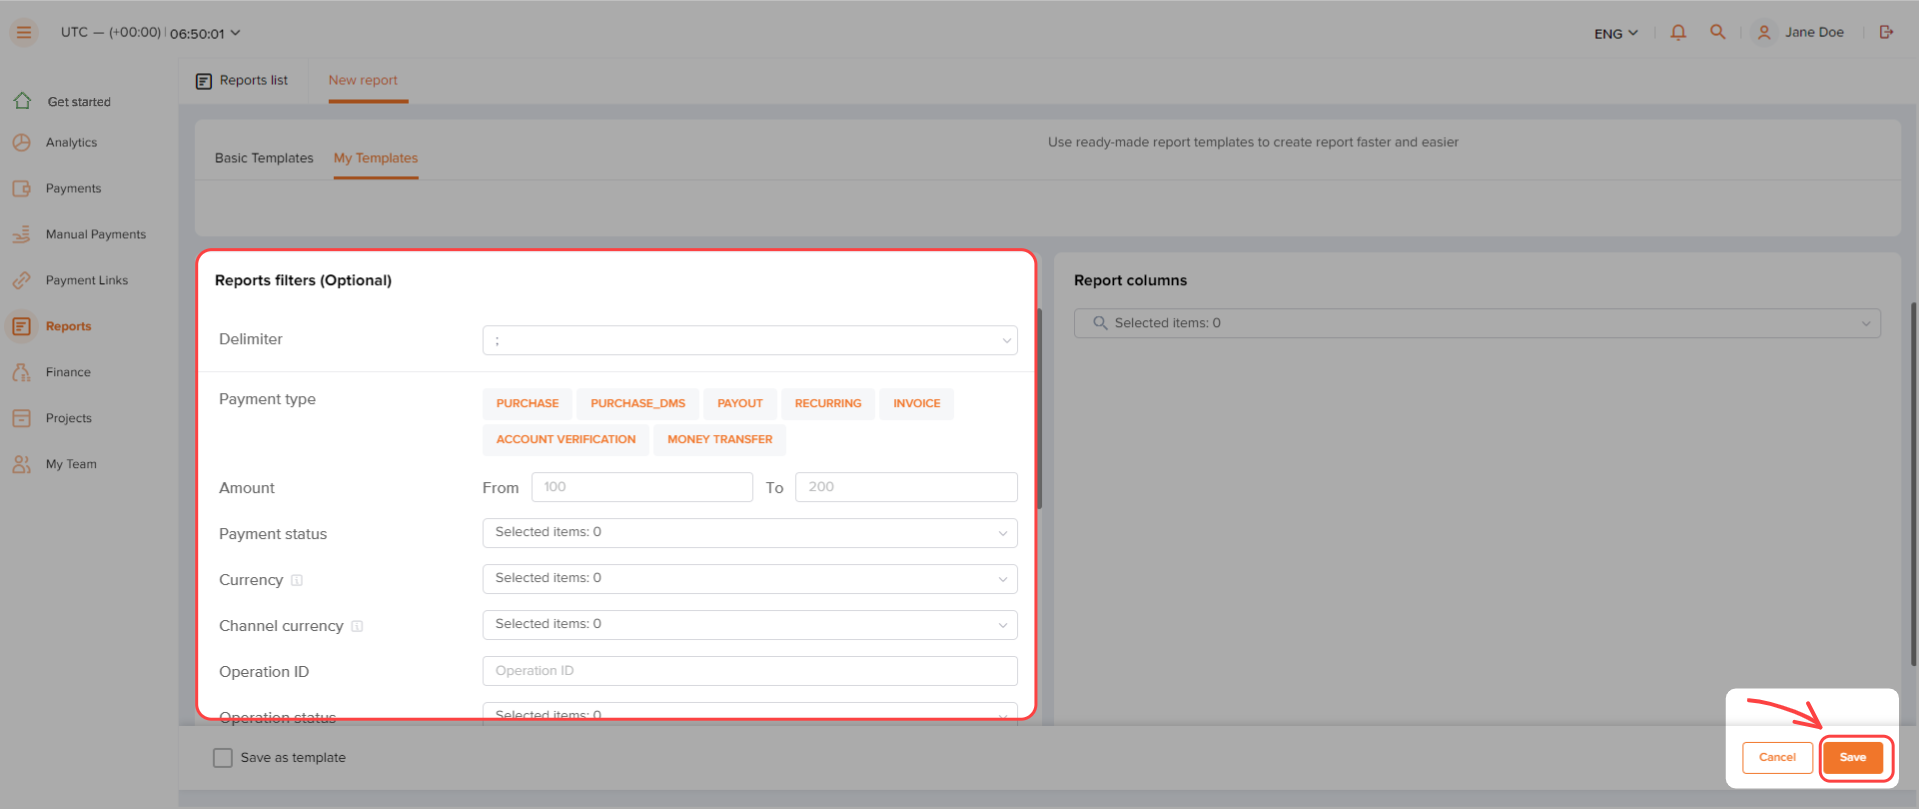
- Click Save.
You can save the parameters and filters of your report as a template for future use by checking the Save as template box in the bottom left corner of the interface. After saving a report as a template, the template will appear in the My templates bar when you create a new report.
After saving your report, it'll require some time to build it. The report will stay in the processing status until it's fully prepared.
Figure: Report that is being built

When the report is built, it'll change its status to success, and you will get an email notifying you that the report is ready to be downloaded. You can download the report by clicking the Download report button in the email or by clicking the ![]() button in the Reports section.
button in the Reports section.
Figure: Report ready to be downloaded

Payment analytics
Overview
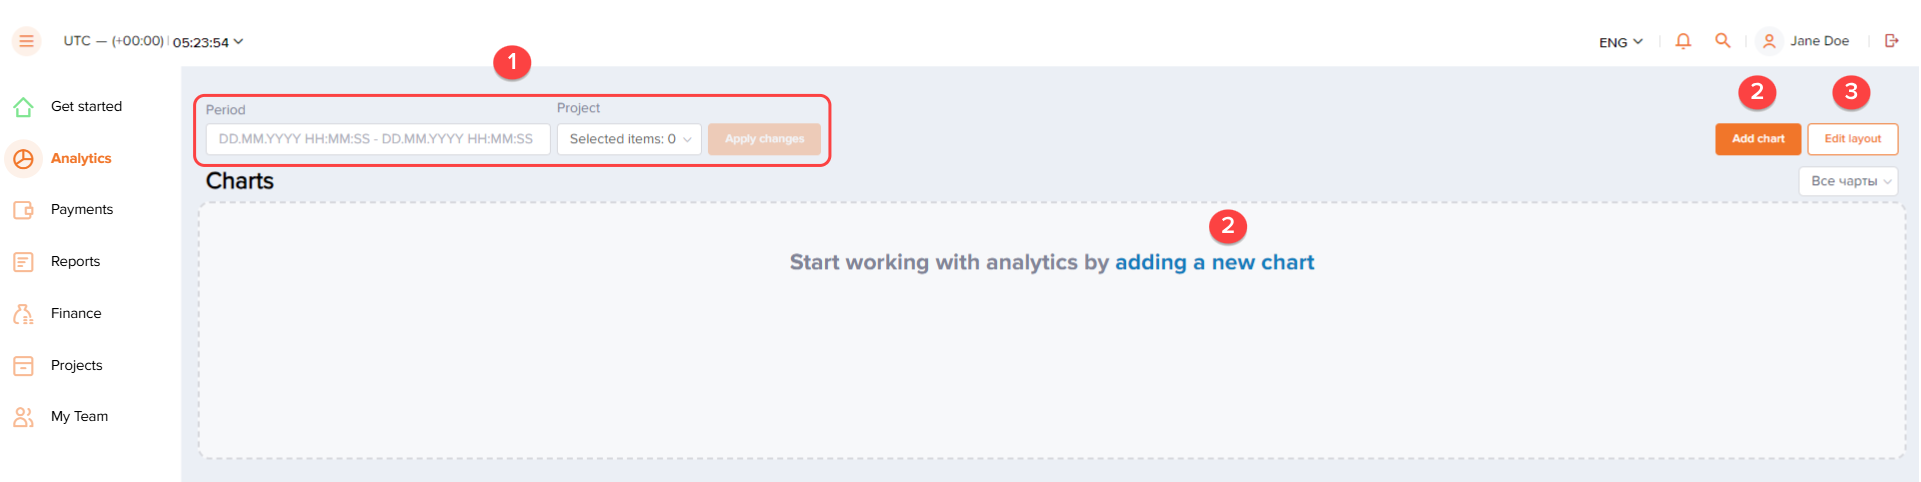
In Dashboard, you can visualize the payment data by presenting information in the forms of charts and tables which can be used when analyzing payments. You can find the tools for creating charts and tables in the Analytics section.
Figure: Elements of the Analytics section: 1—filters to quickly adjust the displayed data (applied to the already created charts and tables); 2—link and button to create a new chart or table; 3—button to change the charts layout on the Charts bar.
You can create new charts and tables in the subsections of the Analytics section as follows:
- Operations—to create charts with information on operations
- Payments—to create charts with information on payments
- Operations in pivot table—to create pivot tables presenting detailed information on operations
- In/out turnover—to create tables with information on the in/out turnover
- Top 10—to create charts with information on the top ten payment methods/countries/banks/decline reasons
- Decline reason—to create charts presenting all possible decline reasons for operations
The following sections provide all the information on how to create charts and tables using the Dashboard interface tools.
Creating charts and tables
With the aid of the Dashboard interface tools, you can visualize the payment data in the forms of charts and tables.
To create a chart or table:
- Go to the Analytics section.
- Click the Add chart button in the upper right corner or click the link in middle of the Charts bar.
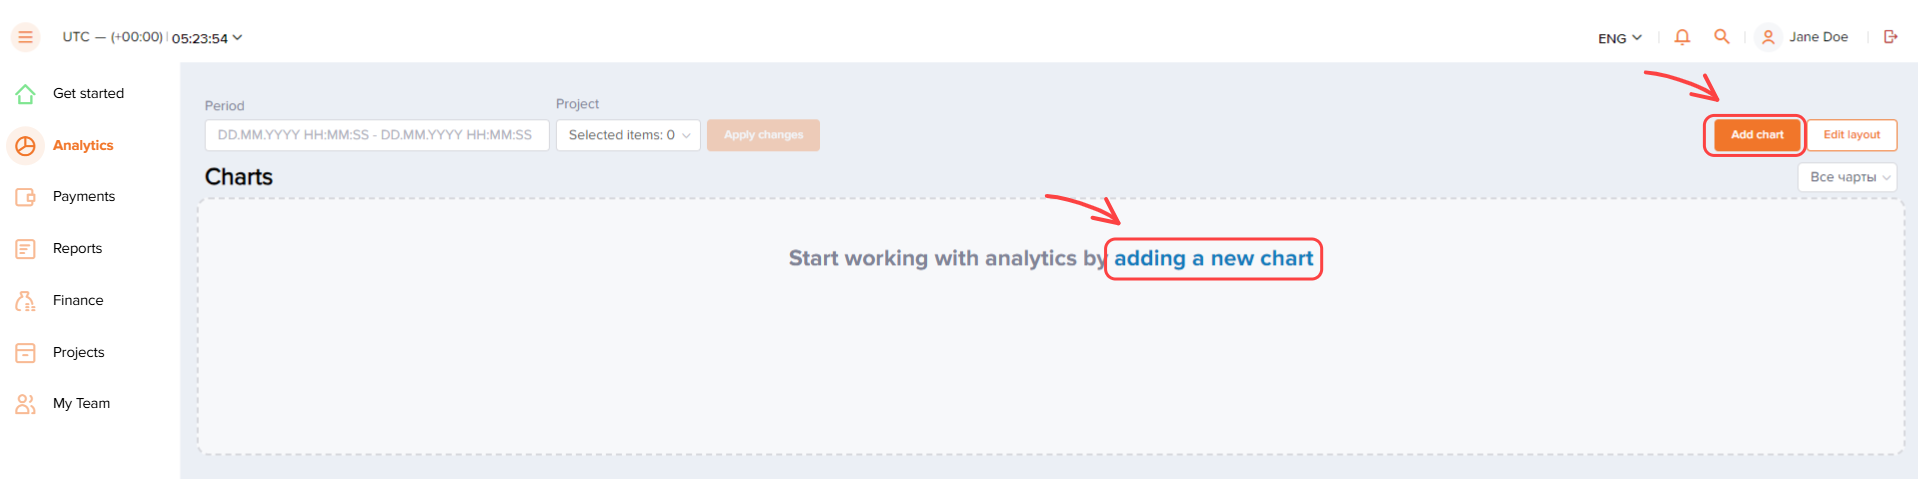
- Choose a subsection you need in the window that opens.
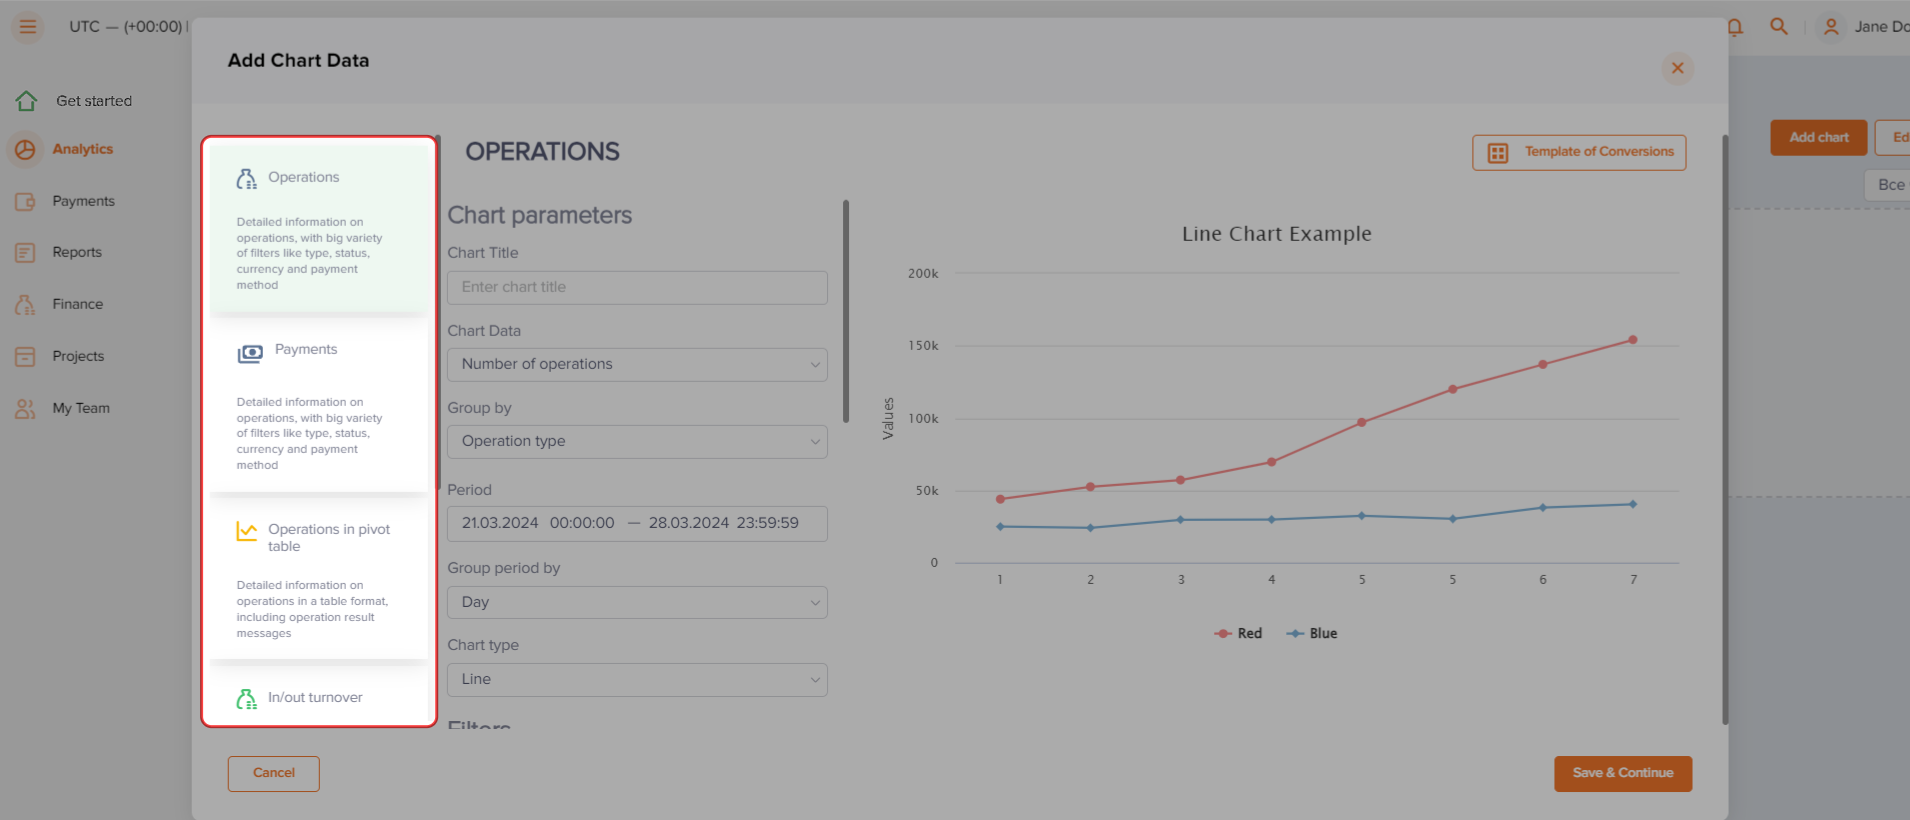
- Set the parameters for the chart or table.
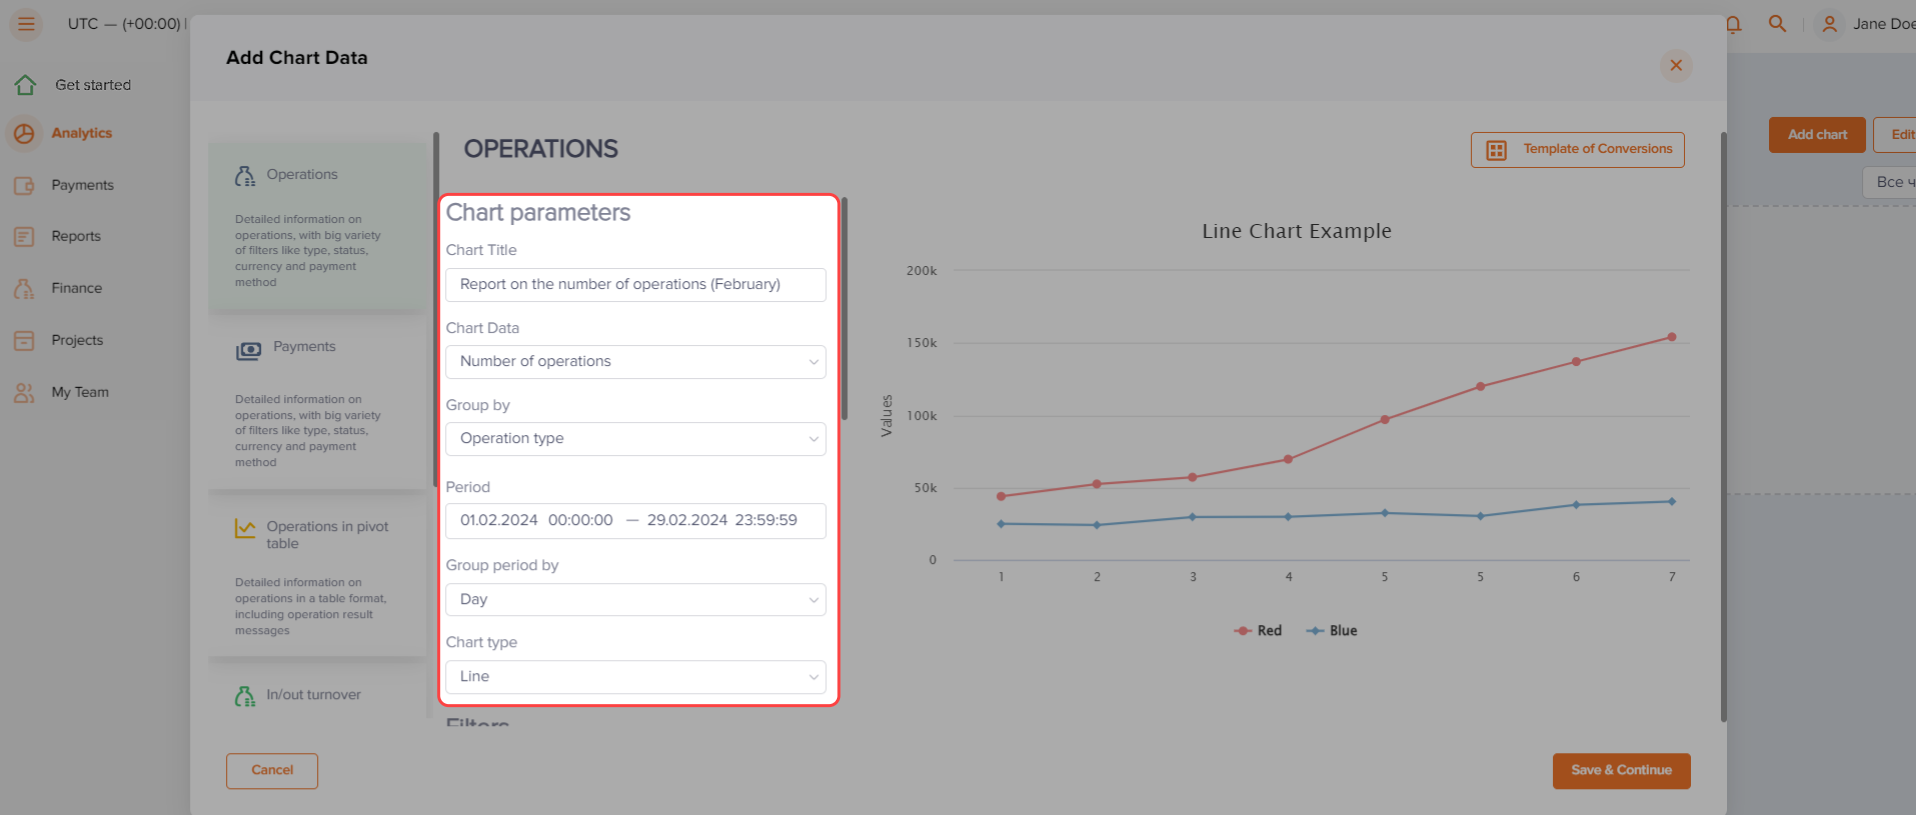
- Apply some filters of interest, then click the Save & Continue button.

After setting the parameters and applying filters, the created chart or table will appear on the Charts bar.
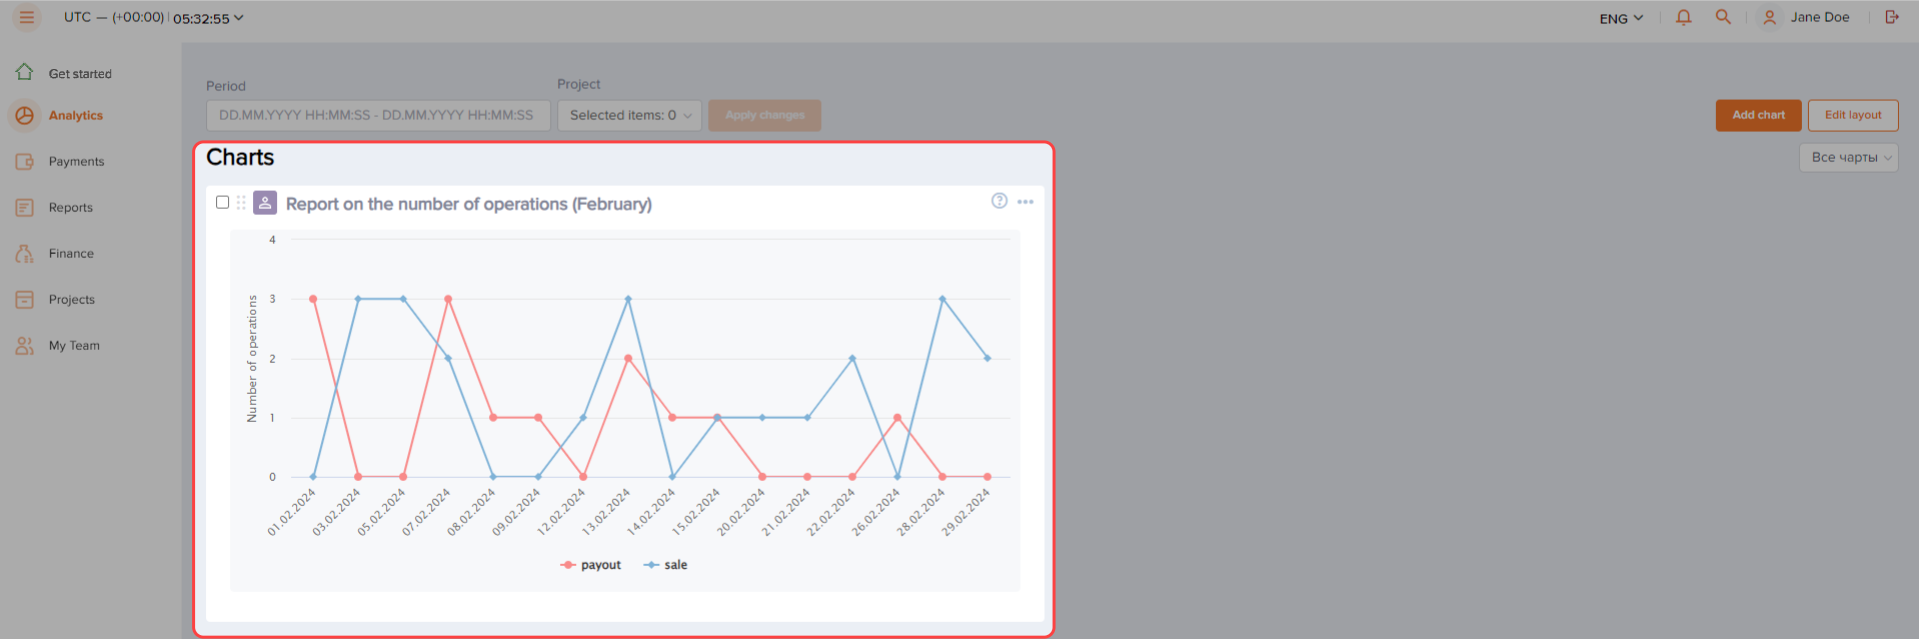
You can view the chart or table you created in fullscreen, delete, edit or download it by clicking the  button in the upper right corner of the chart or table and by choosing the appropriate item on the list.

Creating charts and tables by using templates
You can also use templates with a preset number of parameters when creating new charts and tables. In Dashboard, there are the following templates:
- Conversions—to create charts illustrating the payment conversion for the past seven days. The button to create charts based on this template is available in the Operations subsection.
- Turnover—to create tables presenting the total amount per currency channel for the past seven days along with the payment method type and operation type. The button to create tables based on this template is available in the In/out turnover subsection.
- By issuers—to create charts illustrating ten issuers with the largest number of operations for the past seven days. The button to create charts based on this template is available in the Top 10 subsection.
To create a chart or table by using one of the templates, go to the subsection you need and click the button in the upper right corner of the subsection. You can change the parameters of the template, if necessary.

Mass payments data
File upload requirements
When preparing the file, you can use the templates available for downloading on Dashboard. After you've downloaded the template, fill it in by using any CSV file editor, e.g., Microsoft Excel. Please note that the set or parameters in the templates may vary depending on the operation type or the payment method you initiate the mass payment with.
Keep in mind that your file has to meet the following requirements:
- The format of the file must be CSV and the character encoding must be UTF-8 without BOM (Byte Order Mark string).
- The size of the file cannot exceed 128 MB.
- The parameter names must be placed in the first row of the file. The order of parameters can be random.
- The parameter values must be placed in the subsequent rows. Specifying values for optional parameters is recommended but not required.
- All parameter values in the file must meet the requirements provided in the table below.Warning:
In particular, payment amount provided in the payment.amount parameter must be entered in minor currency units without any decimal point or comma except for the cases when the currency doesn't have any minor currency units (to check whether the currency has any minor units, see Currency codes). For instance, the 10.00 EUR amount must be entered as
1000in the file.If the currency doesn't have any minor units (i.e. the number of digits for minor currency units is zero), enter the amount in the major currency units. For instance, the 10 VND amount must be entered as
10in the file. - If operation parameters are specified in strings (not in table format), parameter values in each row must be separated by a semicolon (";"). In addition, the fields without values are separated by semicolons in the same way as the fields with values, and two or more ";" characters can follow one another.
If you use Microsoft Excel to create the file, make sure that strings do not include incorrect or extra characters. You should use a different editor, e.g., Notepad, to check if extra characters have been added.
Parameters for mass payments
When adding data to files, you can use the parameters presented in the table below.
| Parameter | Description |
|---|---|
|
operation_type |
Operation type. The value can be |
|
general.project_id |
Project identifier assigned by Rocketpay at the stage of integration. |
|
method |
Payment method identifier. For the full list, see IDs of payment methods supported in Dashboard. |
|
general.payment_id |
Payment identifier unique within the merchant's project. |
|
general.operation_id |
Payment operation identifier provided by Rocketpay. |
|
payment.amount |
Payment amount in minor currency units without any decimal point or comma except for the cases when the currency doesn't have any minor currency units. |
|
payment.currency |
Payment currency code in ISO 4217 alpha-3 format. |
|
payment.description |
Payment description. |
|
account.number |
Account number of the customer. |
|
account.bank_id |
Bank identifier received from Rocketpay. For more information about banks and their IDs, see the section on payment methods in the documentation, or contact Rocketpay technical support specialists. |
|
account.customer_name |
First name and last name of the account holder. |
|
account.branch |
Name of the customer's bank branch. |
|
account.city |
City of the bank branch location. |
|
account.region_id |
Region or state identifier of the bank branch location received from Rocketpay. For more information about regions and their IDs, see the section on payment methods in the documentation, or contact Rocketpay technical support specialists. |
|
card.pan |
Card number of the customer. |
|
card.year |
Expiration year of the customer's card. |
|
card.month |
Expiration month of the customer's card. |
|
card.card_holder |
Name of the cardholder as specified on the card. |
|
token |
Card token received from Rocketpay. |
|
customer.id |
Identifier of the customer within the merchant's project. |
|
customer.country |
Customer country code in ISO 3166-1 alpha-2 format. |
|
customer.city |
Customer city. |
|
customer.state |
Region or state of the customer's billing address. |
|
customer.zip |
Postcode of the customer's billing address. |
|
customer.street |
Street of the customer's billing address. |
|
customer.first_name |
First name of the customer. |
|
customer.last_name |
Last name of the customer. |
|
customer.day_of_birth |
The customer's day of birth in |
|
customer.phone |
Phone number of the customer. |
|
customer.email |
Email of the customer. |
|
customer.ip_address |
IP address of the customer. |
Errors messages
The following are the error messages you can see after the validity check of the file uploaded to Dashboard is complete.
| Error message | Possible reason |
|---|---|
| Uploaded content is empty | File is empty |
| Columns are duplicated | Parameter has been duplicated |
| File does not contain required columns | Required parameters are missing |
| Only files with these extensions are allowed: csv | Extension or format of the file is incorrect |
| Only files with these MIME types are allowed: text/csv, text/plain | Encoding or data structure is incorrect |
| Fields are filled incorrectly | Parameter has been filled incorrectly |