User interface
The Dashboard interface is divided into topic-driven sections with each focused on the corresponding data segment and employing specific operation tools. These sections contain a number of standard items while most tasks are solved with the use of registers. To search for data and perform a range of operations, use the main menu located at the top of the page. To switch from one section to another, use the navigation panel on the left.
The following is a summary of using the main menu, sections, and lists.
Main menu
Overview
The main menu located at the top of the Dashboard interface contains buttons that allow the user to customize the navigation panel, select the time zone and the language, view notifications, access the user account profile, and log out as well as to show and hide the search panel.
Figure: The main menu with expanded navigation panel: 1—navigation panel button; 2—current time; 3—language switcher; 4—notifications; 5—search panel button; 6—user information.

Navigation panel
The navigation panel is located on the left side of the interface and contains buttons for switching between the sections that are available for the user account. The panel can be shown expanded with the sections' names and the corresponding icons or collapsed (with the sections' icons and the tooltips with the corresponding names). To expand or collapse the navigation panel, use the ![]() button on the left of the main menu.
button on the left of the main menu.
Clock
The clock with an option to select the time zone is located on the left of the main menu. Selecting the time zone affects the way the data is shown in the payments list, but it does not impact the way business days are determined and counted. Business days for reporting purposes are set in UTC + 00:00.
Search panel
Search panel contains a set of fields allowing users to find necessary payments quickly and efficiently. To increase usability and optimize search speed, the panel shows only the most frequently requested parameters, and the search is carried out only if the attributes provided fully match. The search results can be found in the payments list of Payments section.
Figure: The main menu with the search panel

Sections
The Dashboard interface includes the following sections:
- Get started contains your most recent actions in Dashboard. To ensure quick navigation between your favorite actions, you can pin actions in the section by clicking a heart icon in the upper-right corner of the action.
- Analytics contains a pre-configured set of analytic panels for online analysis of payment and operation processing for your projects (accessible with the appropriate permissions of the user account).
- Payments contains the list of all payments, both completed and in-progress, as well as tools for configuring the way the data is displayed in the list. This section also allows users to view detailed payment information and issue single refunds.
- Manual payments contains the list of all payouts, completed and in-progress, as well as tools for configuring the way the data is displayed in the list. This section also allows users to view detailed payment information and issue single and mass payouts as well as mass refunds.
- Payment links contains the list of all payment link purchases, both completed and in-progress, as well as tools for managing payment links to create, deactivate, and set up auto-sending of payment links to customers.
- Subscriptions contains the list of registered regular COF purchases (subscriptions) as well as tools for configuring the way the data is displayed in the list. This section also allows users to view detailed subscription information, update subscription settings and cancel subscriptions.
- Payment Confirmations contains all references created for some operation types and the tools for exporting references.
- Reports contains the tools to create reports according to specified parameters and to view and download the reports that have been created.
- Finance contains your current balances broken down by projects.
- Projects contains the information about individual settings of your projects (accessible with the appropriate permissions of the user account) and the instruments to configure these settings.
- My team contains the list of all user accounts of your employees as well as the tools to manage the user accounts and to view user actions history.
Lists
Dashboard implements lists to display large volumes of records with payment data or user account information. One section can contain one or several lists. To switch between them, use tabs with the names of the corresponding subsections.
Figure: Switching between lists

The lists are designed similarly, and all of them allow you to configure the number and the order of columns, filter recorded data and perform a number of actions including switching to detailed payment information or deleting a user account.
- Predefined filters—they are available via the buttons located at the top of the list, in the filter area. These filters allow you to select or deselect filtering with the use of a single parameter, for example, payment currency in one-click.
- Custom filters—they are available in a separate panel which is opened with the button on the right located in the filter area. They allow you to filter recorded data according to a total of selected parameters. The settings of such filters can be flexibly configured and saved for future use.
Moreover, depending on the purpose of the list, they include additional tools for working with them. For instance, the payments list allows users to configure the number and the order of columns with the use of the custom filter manager which is opened with the button on the right located in the filter area.
Figure: Payments list in the Payments section: 1—a tab with the list of all payments; 2—a tab with the detailed information about a certain payment; 3—predefined filters; 4—a button to reset all filters; 5—a button to show custom filters; 6—a button to configure payments list display mode; 7—a button to configure additional features; 8—a button to refresh the payments list.
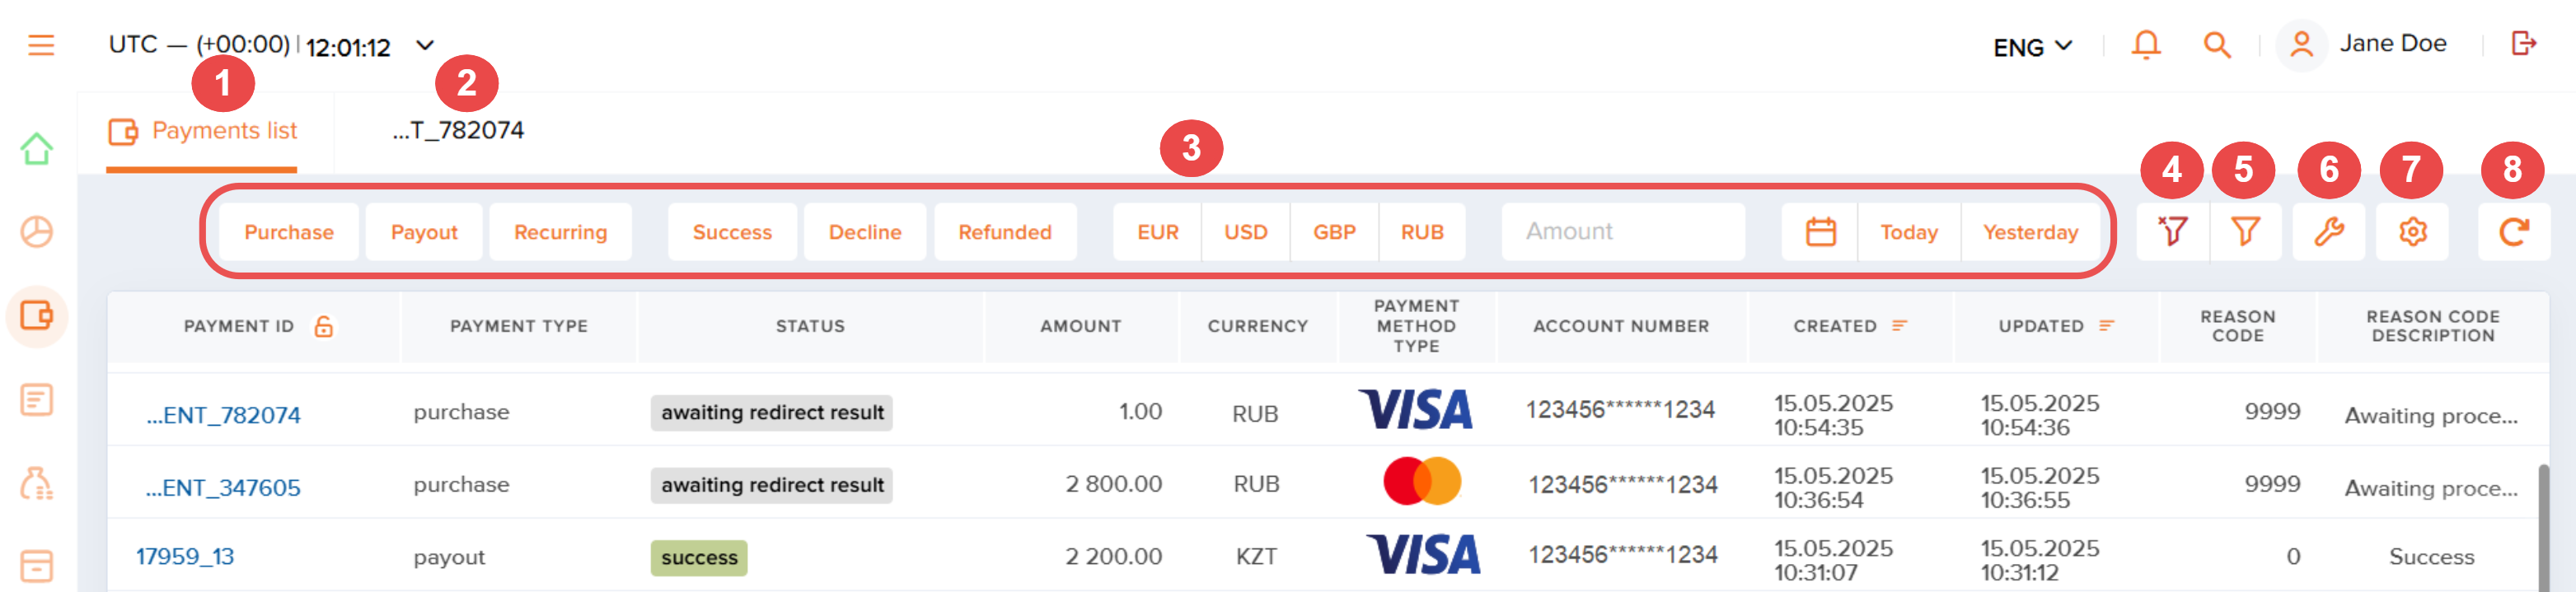
Figure: Payouts list in the Manual payments section: 1—tabs for switching between the lists; 2—predefined filters; 3—tab with the detailed information about a certain payout; 4—button to issue payouts and refunds; 5—button to reset all filters; 6—button to configure payments list display mode.
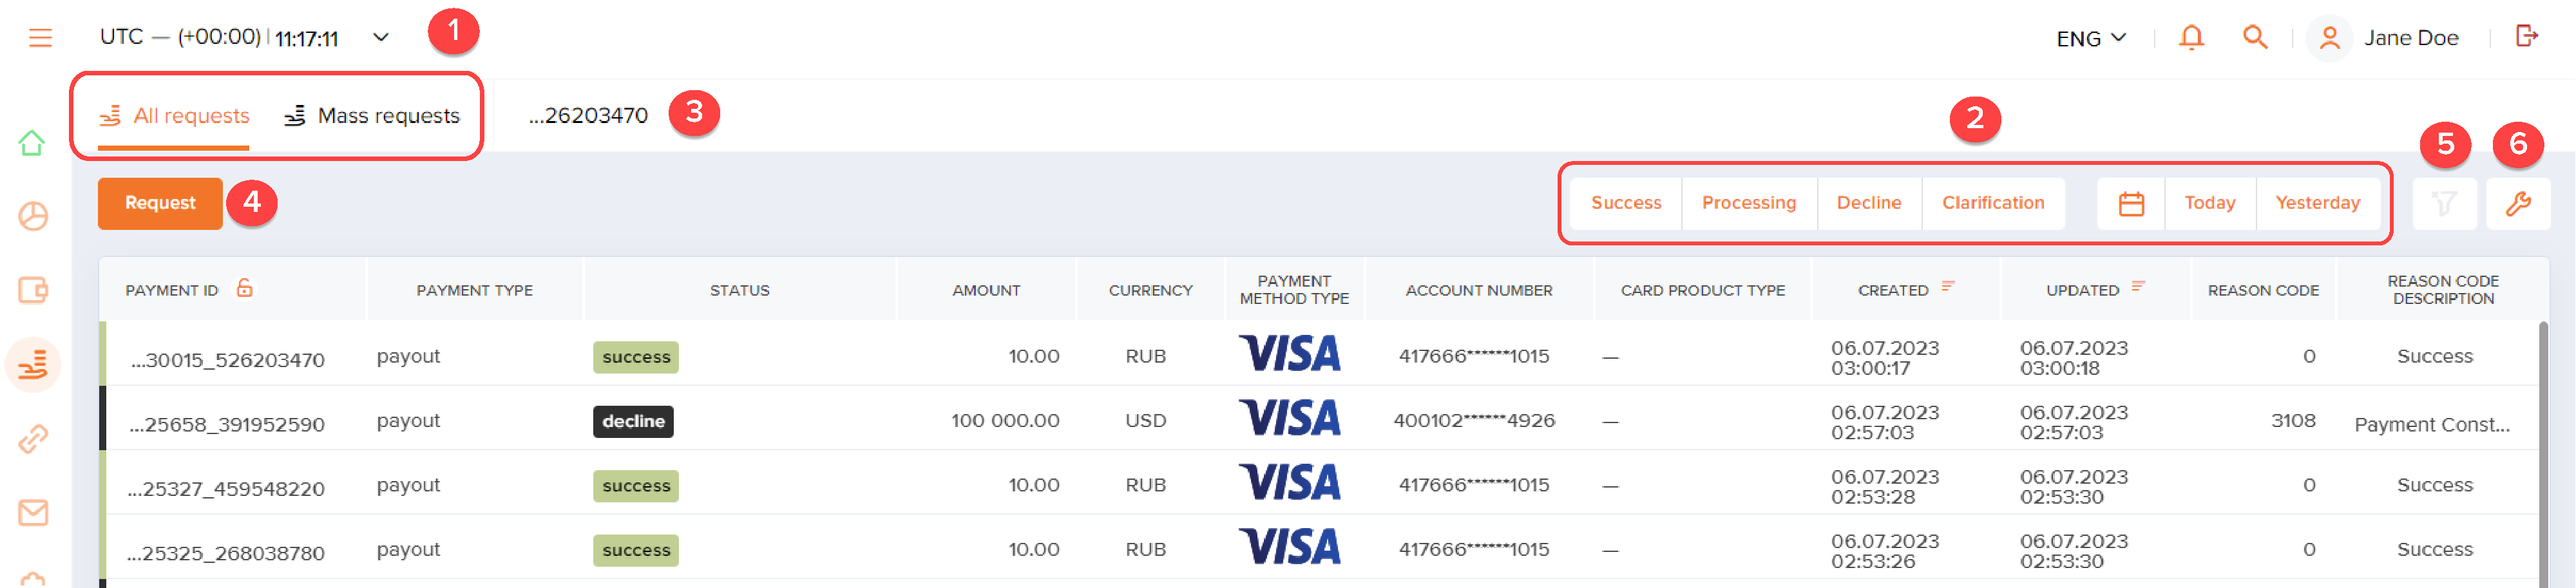
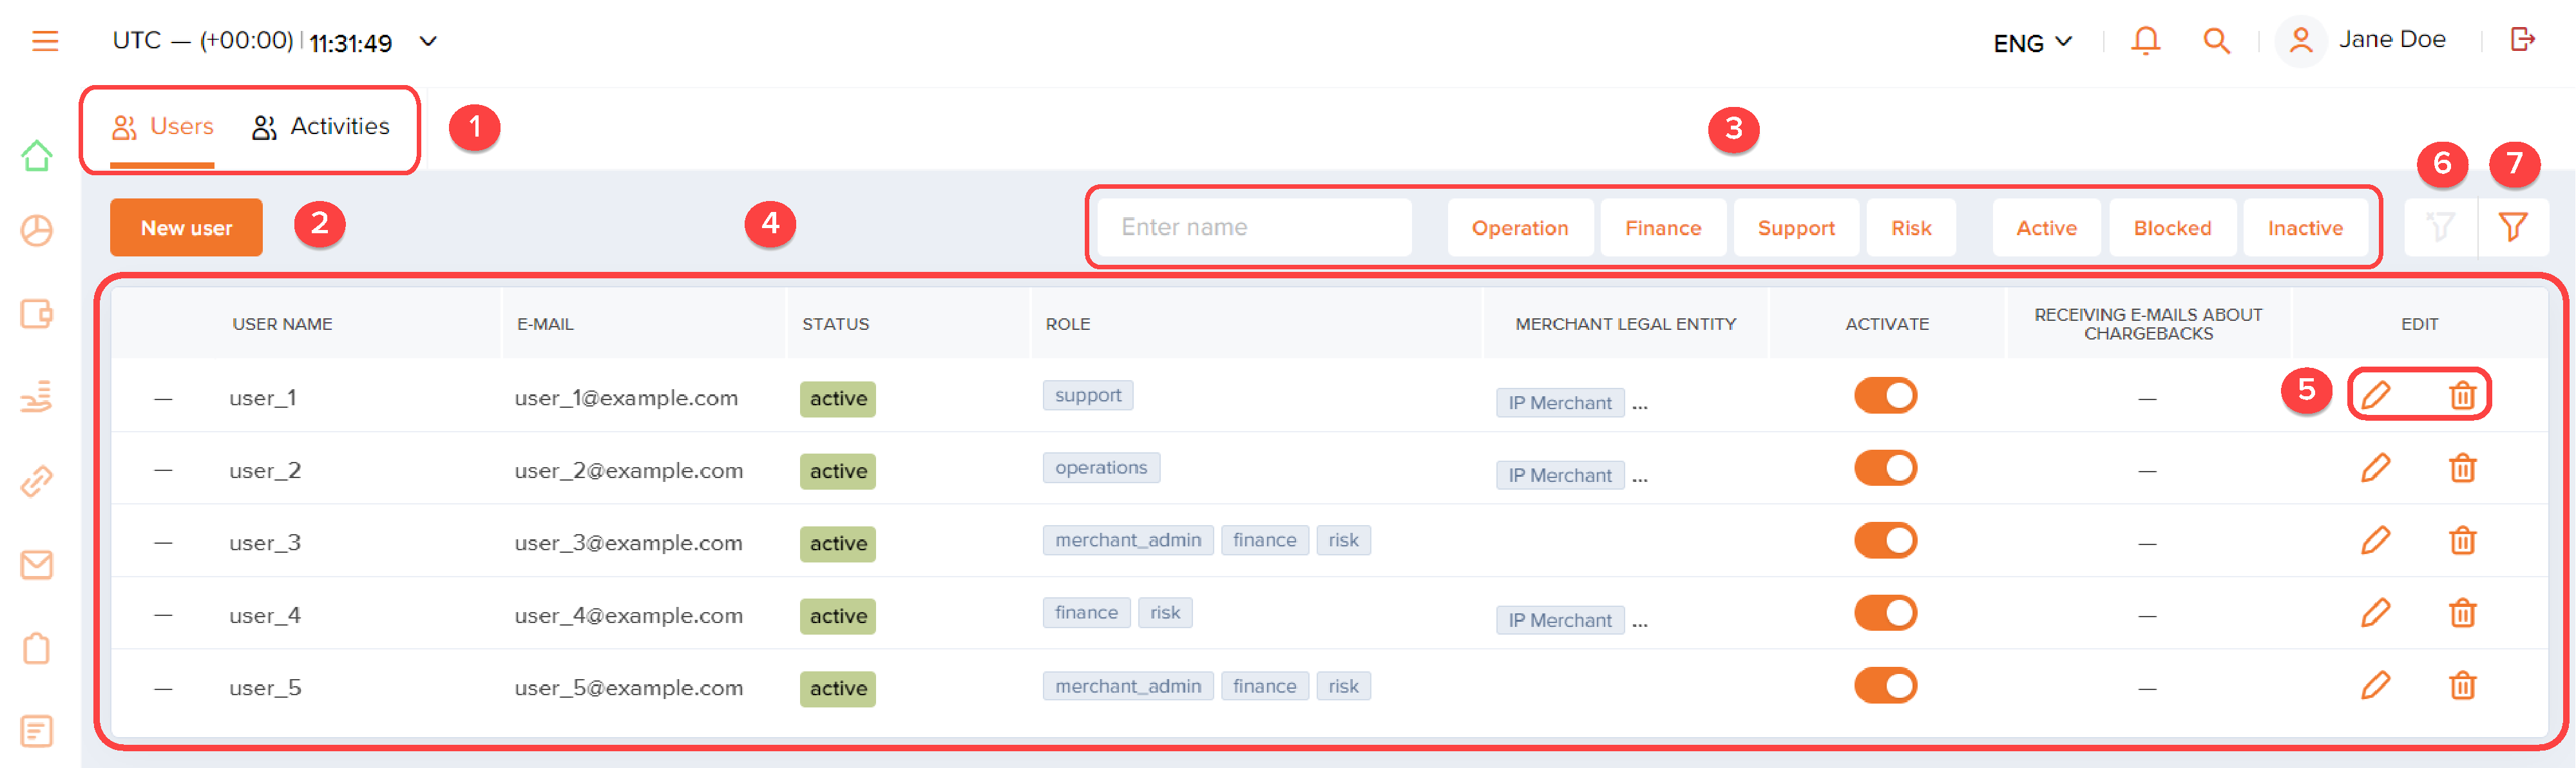
Figure: User account list in the My team section: 1—a button to create a new user account; 2—tabs for switching between the lists; 3—predefined filters; 4—a list of all user accounts of the merchant's employees; 5—tools to edit a user account; 6—a button to reset all filters; 7—a button to show custom filters.