Using the RocketPay payment system for Tilda CMS
This topic describes installation and setup of the RocketPay payment system for Tilda CMS. The payment system (PS) allows you to accept payments from customers on your Tilda-based websites.
Processing workflow
Interaction with the payment solutions by Rocketpay is implemented by using Payment Page. For more information about Payment Page, see Payment Page.
Figure: The workflow of payment processing by using RocketPay

Figure: Payment processing by using RocketPay
- The customer initiates the payment on the web service side.
- PS generates a request for opening Payment Page.
- The payment platform accepts the request for opening Payment Page.
- The payment platform performs initial request processing that includes validation whether all required parameters are available and signature is correct.
- The requested Payment Page is generated by the payment platform as specified in the project settings and request parameters.
- The payment form is displayed to the customer.
- The customer completes all the steps required to complete the payment.
- The payment platform accepts the request for opening.
- The payment platform processes the request and forwards it to the payment scheme.
- Payment is processed by the payment scheme.
- The payment scheme sends callback with payment outcome information to the payment platform.
- The payment platform sends the payment outcome information to Payment Page.
- The result is displayed to the customer on Payment Page.
- The payment platform sends the callback with payment outcome information to the web service.
- The result is displayed to the customer in the web service.
RocketPay automatically generates requests for opening the payment provided Rocketpay has been previously enabled on the site and selected as primary payment method..
Preparing to install RocketPay
- Create your own shopping site in Tilda. For the information on how to create sites in Tilda see Tilda documentation.
- Become Rocketpay customer.
To become Rocketpay customer:
- Submit an integration request by sending an email to newmerchants@rocketpay.kz with the following information about your company and your site:
- Company name
- Site name
- Primary currency for payments on your site
After your request is approved, the technical support will provide the following information which is required to start using RocketPay:
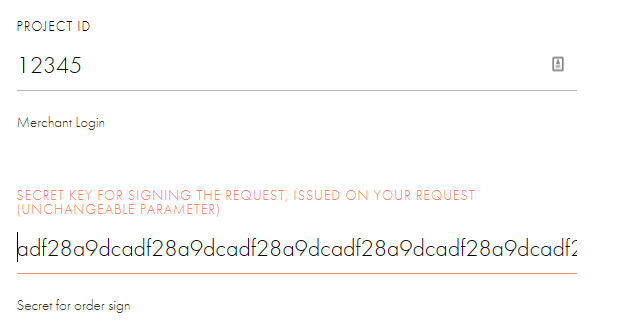
- Project ID—unique ID of your online store.
- Secret key—the key is required for signing payment requests and payment processing.
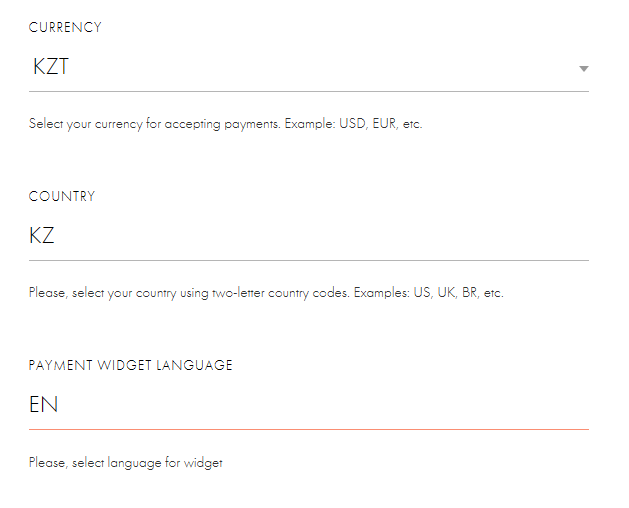
- Currency—primary payment currency in your online store to show on the payment page.
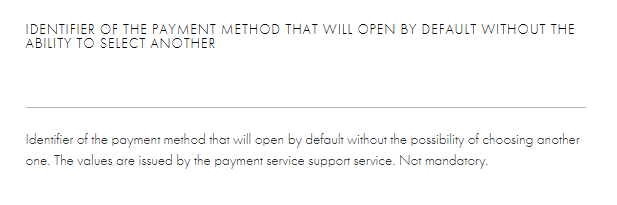
- Payment method ID (optional)—you can use this parameter to skip the payment method selection screen and have the payment page opened with the payment method pre-selected.
Configuring the RocketPay payment system
Once you completed all the preliminary steps parameters and obtained the required information from Rocketpay support, you can start configuring RocketPay to accept payments in you online store.
To configure RocketPay:
- Log on to you account at Tilda: https://tilda.cc.
- In the top menu, select Dashboard, and then click Edit website.
- On the site editor page, click Site settings.
- In the left pane, select Payment systems, and then select in the central pane.
- Enter project ID and secret key you received from the Rocketpay technical support into the Project ID and Secret key for signing the request, issued on your request... boxes, respectively.
- In the Currency, Country and Payment widget language boxes, enter, respectively, the primary payment currency, country, and language to use for opening the page with the payment form.
- In the Success URL box, specify the URL of the page to redirect the customer to after the payment is successfully completed. In the Failure URL box, specify the URL of the page to redirect the customer to when the payment is declined.
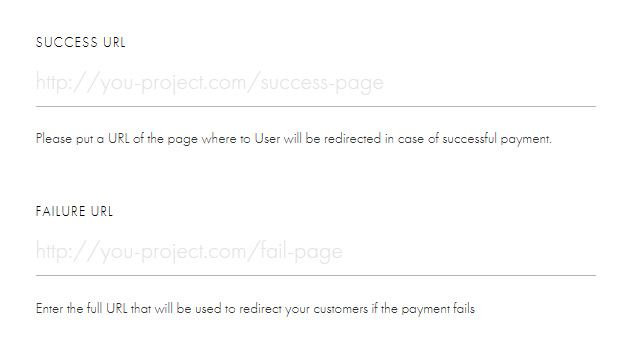
These parameters are optional, but its recommended to specify them to gracefully redirect the customer back to your online store.
If you leave these boxes blank, the customer will not be redirected back to your site and will remain on the payment service page.
- If you want the payment page to skip the payment method selection screen and open with the payment method pre-selected, enter the method ID in the Identifier of the payment method that will open by default box.
For the list of payment methods IDs, see IDs of payment methods supported by Payment Page.
- Click Save.
The RocketPay payment system is set up and ready for use.
If you have any questions regarding setup and usage of the RocketPay payment system for Tilda, feel free to contact the technical support at Rocketpay.